Showing posts with label Coaching for July. Show all posts

Wednesday, July 31, 2013

The deal with crop rotation

Oh crop rotation - it is the magical mystical "Maybe I'll Do That Someday If I Have Some Free Time And Want To Torture Myself" concept that actually does more for your vegetable garden than almost any other single gardeny activity out there.

For reals. I'm not just trying to give you something else to do. Honestly, if you only do one thing for your garden - do this. 

Light feeder rotation with leafies. Plus, isn't it just fun to say, "leafies"? I think so.
It's one of the pieces of the organic gardening puzzle that, once you get the piece to fit, your ALL GO NO QUIT garden starts to really fall together.

Though these cucumbers didn't just *fall* into this basket. There was plucking involved. But that's it! Still easy.
It's also the #1 thing that organic farms and gardens have in common because it's a rule that can't be broken or ignored - unless, of course, you're OK with risking the summer's tomato harvest due to verticillium in the soil.

No risky business here.

You know - verticillium - that soil pathogen (it's actually a fungus) that turns your vulnerable heirloom tomato plants from vigorous fruit producing machines to wilted crispy noodle versions of their previously glorious selves.

Yeah, sad.

But you can avoid verticillium and so many other pathogens and insect pests by simply moving your crops around in an organized fashion. An organized fashion handily called, crop rotation.


It's OK - they don't mind moving around because they don't have to pack a bag or anything.

But it's so confusing! 
But I want to grow tomatoes every year and I only have one place that I can grow them so I don't have anywhere to rotate them!
But I really like spraying chemicals all over the garden in the hopes that it'll stop whatever awful thing from happening that's totally happening just like last year!
But I like going into the gardening season without a clue about where to plant stuff so that it'll grow well!
But I tried it before and it totally didn't do anything!

Yeah, we know.

We hear it a lot. Coming up with a plan for a garden that most folks see as Fun Leisure Play Time isn't really at the top of your Fun Times list. Understood.

Still though...

Why crop rotation is YES!
Making a crop rotation plan gives you a map for planting in every season so when you sit down with your stack of seed catalog porn in the winter, you're not just randomly flipping pages feeling all overwhelmed by WHAT SHOULD I GROW OOH THAT LOOKS GOOD I'LL HAVE ONE OF EACH!

You don't have room for one of each. You know this. I know this. The catalogs know this. And yet still...
1. It keeps cootie insects away
Rotating your crops keeps host-specific pests (say, insects that really like one of your crops better than the others) from setting up camp in your garden and waiting for you to put out the buffet in the springtime.

Why, hello jerk Cucumber Beetle. Glad to see you NOT on the cucumbers.

2. It makes for yummy soil
When you rotate your crops, you have the chance to rebuild nutrients in the soil so that you don't have one plant after the other sucking the life out of your garden without replenishing it. Instead, you can rotate in a crop that actually puts nutrients back IN to the soil for the following crop.

Corn. Sweet delicious corn. The great nutrient-sucker of the vegetable world.

3. Your favorite crops can grow better
You can plant crops this winter that counteract negative effects of this summer's crop for the benefit of next summer's crop.

Love you, Pacific Gold Mustard :)

Let's try an example so that you can see that I'm not just spinning craziness:

You like to grow heirloom tomatoes but you know that they are not verticillium resistant (that's what the "V" means on plant tags and hardly any heirloom varieties have resistances), so during the winter prior to your tomato-growing summer, you plant a brassica (mustard, broccoli, etc) since that family produces a gas in the soil that "biofumigates" verticillium. Then you plan to keep that area free of nightshade plants (of which the tomato is a member) for as many seasons as possible.

Your tomato rotation might look something like:

Winter 1: Brassica > Summer 1: Tomatoes
Winter 2: A verticillium resistant crop > Summer 2: Anything other than Solanaceae/nightshades

And if you're in the situation where you can ONLY grow your precious tomatoes in one spot year after year because of sun conditions or whathaveyou, there are other things you can do to stave off disaster like skipping a year altogether (gasp! I know.) and choosing varieties with resistance to your garden's known pathogens (this is where you look for the "V" on your tomato's plant tags), in addition to a winter rotation with a type of brassica.


Build your crop rotation plan like a pro
Keep in mind what kind of a feeders your plants are and rotate them so that the soil is replenished before planting another heavy feeder type. First, bucket your plants into into categories like Heavy Feeders (corn, tomatoes, squash), Light Feeders (root crops, herbs, lettuce) and Feeders (legumes, alfalfa). Then organize your rotation so that Heavy Feeders are followed by Feeders and then followed by Light Feeders.

I always have seconds.

Know the diseases that plague your plants and then match them with plants and strategies that counteract their nasty effects. Like that whole "tomatoes with brassicas" thing I was talking about before.

Figure out which families your plants belong to so that you can put them in the right place in the rotation. Like your tomatoes belong to the same family as potatoes, peppers and eggplant, so these guys shouldn't follow one another in a rotation.

Get help with your crop rotation
If you want to do this so badly but just can't wrap your brains around all of the details or don't have the time to work it all out - there's salvation!

Kitchen Gardeners International has a great garden planning tool that keeps track of crop families so that you don't have to. Plus - it's super fun to see your future garden come to life and you can move stuff around and design the whole garden space. Which, if you're garden dorks like we are, is pretty effing fun. It won't work out the issues with plant diseases and feeding types, but it's definitely helpful for visualization.

Georgia Organics has a list of tools and software for helping you plan your rotation - everything from seed calculators to downloadable software.

And if you'd rather get your own customized crop rotation plan built for you, we can help you out there. In our Crop Rotation Plan session we'll build a crop rotation plan with you that gives you the freedom to choose the varieties of plants you love to grow each season and a map of where to plant them for great yields, soil health and pest resistance in future seasons.

Then you can eat all of these tomatoes in one sitting. If you so desire. Though it might be messy. GLORIOUSLY MESSY.

Monday, July 9, 2012

Meet the farmers: Shannon & Todd


The farmers: Shannon & Todd (plus two kiddos and two painfully cute dogs)
The farm: A super sunny sideyard with four raised beds and drip irrigation
The situation: Three years ago, Todd built the beds and they grew lots of produce. It was good times. The next year, they planted the same things but didn't get as much in return. Last year, nothing grew. Sadness.
The skills: Soil testing & organic amendment, Kitchen garden planning, Garden installation, Pest management and identification, Garden maintenance, Harvesting

Shannon and Todd presented me with their story of woe - zero production from a previously bountiful garden. Couldn't you just cry for them? I mean, the beds were beautifully made, they were set in a great location on the property (many hours of sun) and they even had drip irrigation. They should have been producing lots of great stuff, but alas, they were not.

So, they called in reinforcements (hi!) so that they could figure out how to get their kitchen garden producing again.

They basically knew what they wanted to grow (tomatoes, cucumbers, peppers) and they were ready to do the work. All they needed was to find out why their garden had gone quiet and a plan for making it productive again.

Helpie.

Meet the farmers: Kristie, Dave & Pennie


The farmers: Kristie, Dave & Pennie
The farm: An unused sunny backyard strip without irrigation
The situation: Once upon a time, Kristie didn't like tomatoes at all. Then she tasted a homegrown tomato from her friend's home kitchen garden and changed her mind. She wanted to try growing her own tomatoes. And squash. And peppers. And, and, and...she was hooked, but didn't know where to start.
The skills: Nursery field trip, Bed preparation, Garden installation, Garden maintenance, Harvesting, Closing down the garden, Spring garden planning

Who knows why people dislike certain foods. Hell, I hated zucchini throughout my entire childhood even though my mom grew tons of it in our childhood garden every single year and fed it to us at every single meal. OK, so in some cases we do know why we dislike certain foods. Thankfully, I got over zucchini, much like Kristie got over her distaste of tomatoes. All it took was a few homegrown tomatoes carefully handed off from a coworker before Kristie decided that she was in love.

But then what? Was she expected to sate her new found love of homegrown tomatoes with just those gifted by gardeny friends?

Um, no.

Kristie wanted to grow her own tomatoes. All different kinds, but specifically the variety she'd fallen in love with (Better Boys). And also squash. And peppers, too.

And how about some herbs? Can I grow basil? What about rosemary?

Kristie knew that she wanted to grow some vegetables and that she had a good sunny site for a garden, but didn't know where to start figuring out the best way to grow organically and productively, how to choose the best varieties, when to plant them, how to care for them and, later, what to do with all of them.

She wanted some guidance, coaching if you will, on which varieties to choose, how and where to plant them, guidance on watering, feeding, care, harvesting and troubleshooting. She wanted to be able to ask lots of questions, but do the work and reap the benefits on her own. 

And she wanted HER OWN tomatoes. That was two years ago. Now on her second full swing season of growing tomatoes (and peppers, cucumbers, squash and herbs), she's really getting a lot from the previously ignored strip of dirt in her side yard.

Meet the farmers: Heather


The farmer: Heather
The farm: A sunny strip next to the driveway with irrigation nearby
The situation: Heather wanted to grow a tomato but hadn't the foggiest how to go about it.
The skills: Kitchen garden planning, Garden installation, Garden maintenance, Harvesting

Girlfriend wanted to grow a tomato. That's all. But she admitted right up front that she was not a gardener and she thought that her property was probably too shaded for sun-loving vegetable plants.

Alas, her desire to pick a sun-warmed tomato off of her own plant from her own yard for her own caprese salad was too strong and so she gave in and let me poke around her yard *just to see* whether there was a chance that vegetables might grow there.

She knew what she wanted to grow (TOMATO. MUST HAVE TOMATO.), but she didn't want to have to do a lot of work figuring out how to make it all happen. She also didn't want to put in a tomato plant just to have it tragically die.

She wanted a plan, lots of specific direction and as much automation and hand-holding as one coach could possibly manage so that she could harvest her own tomatoes.

And so began Heather's Indie Farming experience.

Sunday, July 8, 2012

French-ish Vegetable Soup


Ingredients
4 small kohlrabi bulbs, peeled and cut into 1" chunks
1 cup of string beans, trimmed and halved
1 medium carrot, coined
1 chicken breast, cut into 1" chunks
15 oz cannellini beans, drained and rinsed well
2 cups of chicken or vegetable broth
1 cup of water
2 T pesto
2 T shredded Parmesan
Salt, pepper

To make
Bring the broth(s) to a boil over medium-high heat, add the chicken and let it simmer for about 5-7 minutes or until the chicken is cooked through. Add the beans, string beans, carrot, kohlrabi and water and let it simmer for another 10 minutes. Serve with a tablespoon of pesto stirred into the warm soup with some Parmesan, salt and pepper on top.


Vietnamese Table Salad

This week I tried out a few new Asian inspired dishes. I wouldn't necessarily call them "traditional" or necessarily derived straight from any particular genre of Asian cuisine, but just inspired.

This recipe was from Sunset for Sizzling Saigon Crêpes: Bánh xèo

Don't worry if you can't pronounce the name. I can  not. But I sure can eat the resulting recipe. 


And how.


This recipe uses a ton of vegetables, so you can also clear out the last of the lettuce in the garden, prune back basil to normal heights, and use up any onions, jalapenos and chives you  have on hand.


Sunset says that this, in its homeland, is known as a table salad, but I'll just say that we ate it like one might eat tacos. Which is something with which we're a more bit more experienced, living in Northern California and all.


Beauty is that these aren't crepes like you get at those crepe type places where they just wrap a crepe around whatever filling (which is also good, but still), but instead like an egg-less and gluten lite omelet that's got pork, onions, chives, mushrooms and bean sprouts all in the batter and therefore INSIDE the crepe.

Very good, people. Very good.

And, since I didn't make any changes to the recipe, you can see what Sunset has to say on the subject.

Chard gratin dip

In my ongoing battle with the chard, I've learned a few tricks.

Like how to make one giant dish with one giant pile of chard that can then serve two purposes. 

This is helpful when cooking for one or two people who don't want to eat six servings of one dish in one meal but can be talked into finishing it if it's dressed up differently later.

Let me explain.


aaaaaaaaaaaaaaaaaaaaaand

Chard gratin dip

Chard gratin
2 lbs chard leaves (12-16 stems w/ leaves)
2 cups milk
1 onion halved/sliced
1 cup grated Gruyere
4 T butter
1/4 cup flour
1/4 cup bread crumbs
Sea salt
Black pepper

Preheat your oven to 350 degrees. 

Boil some seasalty water and add your chopped stems.


Give it a few minutes and add your ribboned leaves.


Then drain your chard after a few minutes and preheat the oven to 350.

See how small all that chard got? That's the best.


Grease a 9x13 glass dish.
 
In a saucepan, melt the butter and then add your onion to cook until it's soft. Whisk in your flour until it's all pasty. Add your milk and bring to a boil. Then lower the heat and add your cheese. Now add salt and pepper until it tastes the way you like it. Add your chard and stir.

Now scoop all that into your dish, cover it with breadcrumbs and bake for about half hour or until the breadcrumbs start to brown.

Serve with some grilled fish or other delicious main dish item of your own choosing.

And later, when you have 2+ servings left over, get some bagel chips or fresh bread and serve them up as dippers for the Chard gratin dip you'll have once you reheat the leftovers in a ramekin with a new layer of breadcrumbs on top.

Good eating.

Wednesday, July 4, 2012

The Best Sauce Ever. Yep.

I know it sounds like big talk - just having one tomato sauce recipe for every purpose, but I tell you, it's just that good. In fact, it's known in my house as The Best Sauce Ever. Yep. and I believe that it is. 

I've used this sauce to toss with pasta, gnocchi, in lasagna, in eggplant Parmesan, over ravioli, mixed with chopped greens like chard and kale, simmered with some meatballs and - I won't lie to you - I've even just eaten it with a spoon.

For the past five years I have loved no other tomato sauce and life has been great.

I dare you to make this sauce with your homegrown tomatoes and then try to tell me it's not the tastiest tomato sauce you've ever eaten. 

I DOUBLE DARE YOU.

The Best Sauce Ever. Yep.

Ingredients:
4-5 large ripe fresh garden tomatoes, sliced into 1" rounds
4 good sized fresh basil leaves
1 head of garlic, top chopped off
1/3 cup red wine (I usually use a Cabernet)
Kosher salt
Fresh ground pepper
Extra virgin olive oil

To make:
Preheat oven to 450.

Cover a rimmed baking sheet with foil and then coat the foil with some olive oil. 


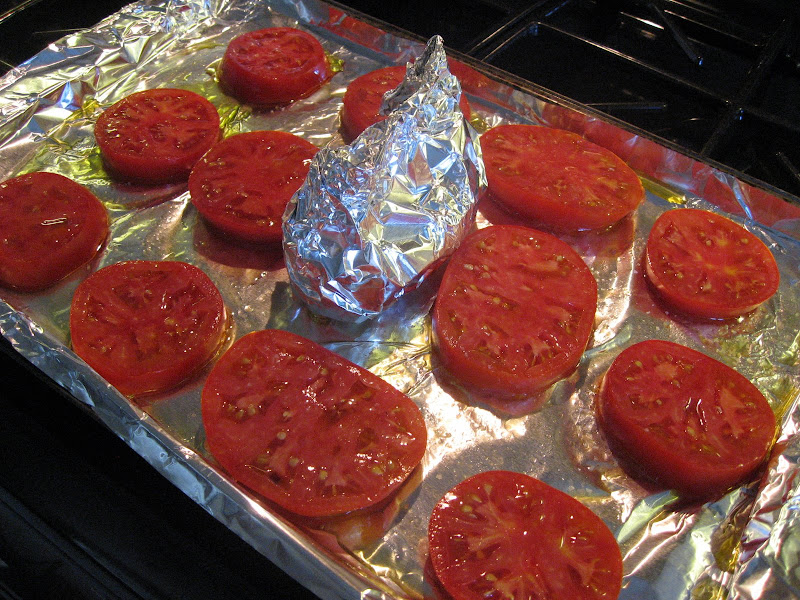
Place the prepped garlic head on another piece of foil and drizzle some oil on the top cut end of the garlic and add a bit of salt. Wrap the foil around it into a nice package. Put it in the middle of the baking sheet.

Place your tomato rounds in a single layer on the baking sheet around the garlic. Drizzle all the tomatoes with olive oil, salt and pepper. 


Roast it all into the oven for 30 minutes.


That blackness is what you want to see when you take the tomatoes out of the oven.

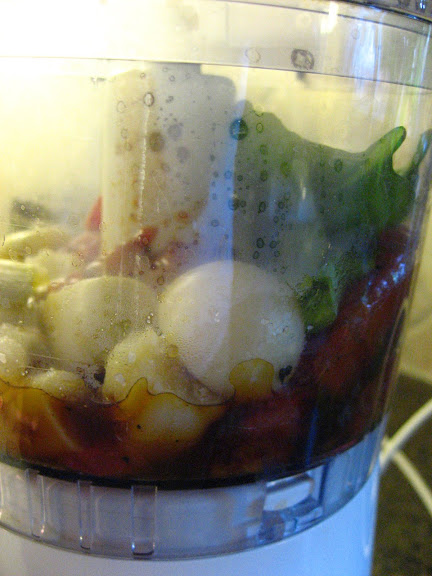
Pull out the food processor and add all the tomatoes (they'll be a bit charred and maybe a little grabby when trying to peel them from the foil - try hard). Unwrap the garlic and squeeze in the cloves (they'll be like paste - it's cool). Add the wine, basil and salt/pepper as you like it.


Puree the whole mess until it's one even consistency and no giant basil bits are jamming around in there.


Like I said before, you can toss it with some pasta, stew it with some meatballs, add a bit of cream and serve over gnocchi - seriously, whatever. Or just eat it out of the Cuisinart with your spoon because it's so good you won't care that you just ate sauce for dinner while standing in the kitchen.