Showing posts with label Garlic. Show all posts

Sunday, February 1, 2015

Coaching for February

Your winter crops are gone by now, right? RIGHT. 

Because YAY spring is ON.

But what are you doing about it? 

Are you tending to an early spring vegetable crop, testing and amending the rest of your garden's soil for forthcoming warm season crops and gathering all of your know-how and materials to get those sun-loving vegetables planted by the end of April?

If you had to avert your eyes from that last question - we understand. Prepping your garden for the big awesome warm weather growing season can be daunting. It feels like there's so much to do and know and do some more to make sure that it's all in place to have a successful growing season.

The good news is that it doesn't have to be scary. It doesn't have to be overwhelming. It can be rewarding and delicious with just a bit of preparation and planning. 

So planning, then...

Warm Season Garden prep
Test your soil
You can send your soil off to a lab to be tested or you can do it yourself at home with a kit that tests pH (soil's acidity levels), N (nitrogen), P (phosphorus) and K (potassium). While you won't get the micronutrient levels in the home test kit that you would from a lab, it will give you enough information to amend your soil's macronutrients (N, P and K are the three majors) to your specific crop's heart's desire. And isn't that what you want? Desirable crops? Knew it.


Amend your soil
Once you've tested your soil and found that there are a few nutrients that it needs, you can organically amend it by adding in bone meal for phosphorus,dried blood meal for nitrogen and a mix of organic materials for potassium for any deficiencies. It's also a good idea to add a layer of organic amendment (We like Gardner & Bloome's Harvest Supreme.) at a rate if about 1 2 cu ft bag per 25 sq ft.

Clear weeds
This is crucial. Weeds around your garden are basically just houses for pests. Aphids, white flies, slugs, snails and all kinds of nasties take up residence within chewing distance of your garden in weed stands of any size. So pull those weeds or, if you're not into hand pulling weeds, arm yourself with a scuffle hoe (also called a Hula-Ho, Flex Ho and HO knows what else. Joke. That was a joke.) and go to town on those weeds in minutes flat.

Check/fix your irrigation systems
Before you get all ready to plunk plants into your garden's soil, make sure that the life giving water source is working properly. Remove filters from dripline manifold heads, flush the systems, clean the filters, check emitters for clogging, clear any clogs and replace any emitters that are beyond redemption. 

Once everything's working properly, set up the driplines and emitters in your garden and set your irrigation program accordingly. Then test it without any plants in the ground and on dry soil. This way you can see the wetting pattern of the driplines and make sure that they're even. Replace any lines that are beyond redemption.

If you water by hand, make sure that your hose head is still in good condition, tighten connections between hose bibs and hoses and check your hose for any cracks or unmanageable kinks. 

If you're handwatering by can, rinse that baby out and put it near the water source so that you'll be sure to water at the first sign of dryness.

Find all your structures
If you're going to use any structures in your garden; tomato cages, bean trellis, cucumber trellis, cans to prop up melons and pumpkins, re bar to stake pepper plants, etc; go find them all, clean them up and make sure they're ready to rock.

Gather your seeds and plants
It's spring. Do you know where your plants and seeds are? If not, now's the time to source them. For reals. 

Some amazing plant sales are coming to a farm, park and college near you:

Stock up on fertilizers/compost, row covers, organic pesticides
Before you get everything planned and planted and growing, stock up on the things that you'll need to keep your garden happy once it's in the ground. Bags of finished compost near the garden (or your own finished compost), row covers to put over new squash plants to keep pests away and some Safer's Soap in case pests take up residence are good things to have on hand so you're not scrambling to find it when you need it. Or, worse yet, forgoing it altogether because "Pffffffffft. Who has the time?"

Yeah, we've all said it, but don't let this be you. Not this year. This year's garden is going to be magnificent. And productive. 

Now, what about those cool season crops?
Early Spring Greens
Now: Those greens planted just a few tiny weeks ago when they were few and tiny are now, surprisingly, bushing out and making their way into the menu rotation.
Next: You probably have a few weeks left before they succumb to the warm weather (anything over 70 degrees toughens them up and they start to flower).

To do: Harvest and enjoy your greens at their taste and production peak! With temps consistently in the high 60s, they'll do well as long as they get consistent moisture, so check the soil to make sure it doesn't dry out. 
The old school moisture test (good for heat sensitive plants with shallow root systems, like lettuce):
  1. Gently press your fingers to the soil's surface.
  2. If soil comes back on your fingers, there's plenty of moisture.
  3. If no soil comes back on your fingers, it's time to water.

Peas
Now: They're taking to their trellis and climbing a little bit higher every warm day. 
Next: They'll keep climbing ever higher and, depending on your variety, will start setting flowers after they've grown a few feet tall.

To do: With the warmer temps, it's a good idea to mulch around the base of your peas to keep the soil temperature cool. This keeps the plants happy and lets them continue with their normal pace. If they get too warm, they will go into shock and won't develop normally.


Garlic
Now: Ripening
Next: Our warm temps are cuing the garlic to get to developing, already. So that's what they're doing. Thicker above ground growth and bigger cloves below the soil. 
To do: Still, nada. When most of the lower leaves are brown and the tops are still green, we'll harvest them by lifting them out of the soil with a garden fork dug in widely around the base. Then they'll cure. THEN we'll eat them. But not yet. Be patient, you. 


Herbs & Flowers
Chives 
As the temps warm up, the chives go into overdrive - which is great. Go grab some bunches of chives and chop them up with your early spring greens and some fresh herbs for a fancy ass salad that will impress your dinner guests or at least fancy up your own lunch. 

Ever just tucked fresh chives into a quesadilla? Go on and try it and then tell me that growing chives was a waste of time. You won't be able to do it.

Dill  
This stuff is starting to look a little haggard, that's true. If given enough time, it will blossom with yellow blooms and attract all kinds of beneficials to your garden, like hover flies and honeybees, but if you're trying to make room for warm weather crops, it's OK to harvest this completely and make way for other stuff.

If you want to leave it in to benefit your warm weather crops, it is an excellent companion for cabbage, corn, lettuces and onions.
I've been better.
Nasturtium
It's back! Yay! It's back! Nasturtium does so much in the garden that it's a good thing that its down time is so brief in our area. It's frost tender, so it's out of the game from about December through February. But as soon as the temperatures warm up the nasturtium is the first to jump up looking for sun. 

If you didn't have any nasturtium growing last year (which will mean that its seeds are 99.9% likely to have overwintered in your soil and will be germinating now, if not super soon), get a packet or two of your favorite varieties (there are tons) and drop in a few seeds where they'll be sure to get watered. 

In a few weeks you'll see their little round leaves poking out of the soil and, not long after, trailing vines of dark (or variegated) green leaves and bright colorful flowers.
Don't pull me out. I'm not a weed.

Nasturtium serves four high-fiveable purposes in the garden:
1. It's a living mulch
It grows along the soil's surface and keeps the soil cool and the weeds down. Plant some at the base of your peas and let them live all symbiotically. Optional: Sing kumbaya.


2. It's a cut flower
When you have a couple dozen blossoms open, go out to the garden with a jar of water and snap off the flowers about half a foot down the main stem and arrange a beautiful bouquet. They'll last about a week and the plant will work even harder to put out even more blooms. You'll have bouquets through fall. Seriously. It's awesome.


3. It's edible
Ever had a fancy salad in a restaurant that came with flowers on top? You can do this at home and save on the valet service while still feeling fancy. Just pop off a few of the blossoms, rinse them gently to remove any hitchhikers and toss them with your salad greens. They're a little peppery and add great color. Plus, imagine the fancy factor - it's a thing.

4. It protects cucurbits and fruit trees
If you're growing cucumbers, melons or squash, this is your man for companion planting. It has been said that the evil cucumber beetle can't find its way to your cucurbits  with this guy vining its way all over the place and it also attracts beneficial insects to its blossoms.


Wednesday, June 19, 2013

Fastest pickles in the west. Or anywhere for that matter.

Um, are your cucumbers suddenly all, "HI! We're here! And we brought all of our friends!"?

Because ours are. BOY HOWDY are they.

But, since we've long run out of pickles from last year's crop of cucumbers, we're OK with it. In the sense that we're totally thrilled.

You can't tell from this photo, but we're doing handstands and cheers and stuff.

And since we haven't had homemade pickles since some time over the winter when our cupboard ran empty, we want this year's pickles NOW.

But canning pickles takes sooooooooooooooo long, right? Then they have to sit in the cupboard and cure for a while before they're really good.

Thankfully, there's the mighty refrigerator pickle.

Oh, refrigerator pickles - they are our spring time savior. Just when we can't wait any longer for the first crunch of pickle season, refrigerator pickles fill the bill like total pros. And you don't even have to have that many cucumbers to fill this recipe. Seriously, all it takes is about 3-4 cucumbers and a pint jar and you're good to go.

Or 12. We're not picky.

And - hey if you happen to have lemons coming in this time of year and a bit of dill growing in your garden somewhere, you're about to be pretty pleased with this recipe.

Indie Farms' Favorite Fridge Pickles 


Makes 1 pint
Ingredients
3-4 smallish pickling cucumbers (we like National Pickling, Homemade Pickles, Solly Beiler and Boothby's Blonds a lot for this)
4 garlic cloves, peeled
1 lemon, sliced horizontally
1 sprig of fresh dill
3/4 cup vinegar (white vinegar is fine, apple cider vinegar is good, too)
3/4 cup water
1 T whole peppercorns
2 t kosher or sea salt (just don't use table salt)

To make
  1. Wash those cucumbers and slice off the tips (this keeps them from bittering up - ew)
  2. Boil some water in a small pot and give those cukes a quick dunk (10 seconds is plenty). This will improve the flavor of your pickles. Promise.
  3. Combine vinegar, water and salt in a small pot and bring to a boil
  4. Add a couple of the lemon slices, the peppercorns and the garlic to the jar. Then pack in your cucumbers and dill sprig and top with another lemon slice.
  5. Pour the brine over the cucumbers and fill the jar to 1/4" from the rim 
  6. Screw on the lid and put your pickles in the fridge for a day
  7. 24 hours later - EAT PICKLES WOO!
See, wasn't that easy? It was. And in a day you're going to be crunching your face off with pickle glory. So, you know, enjoy that.

Thursday, October 4, 2012

Starting cover crops

With the late heat we've had in Silicon Valley, the cover crops are going to go in a little later than usual so that the summer vegetables can take advantage of the last burst of heat to give us more tomatoes.

Black Brandywine and Better Boy tomatoes. A fine pairing.
Sure, there are other plants out there doing impressive things, but our main concern is usually the tomatoes. This year is no different.

The extra time before planting cover crops and winter food crops is also good because it gives us a chance to start some of our winter crops indoors so that we can plant stronger transplants into the winter garden rather than vulnerable seeds that can get mowed down by a single hungry pest. 

If you've ever put seeds in the ground in spring and then watched as their nubile little stems emerge and then get summarily gnawed to a nub by a mysterious bug under the cover of darkness, you know the pain all too well.

Churchill Brussels sprout starts. Be strong, boys!
We can't have that happening to our beloved Brussels sprouts (or "Winter tomatoes" as we like to call them since we love them oh so much), so we try to start them indoors before planting out.

Other crops are planted so broadly by seed that a few going down the gullets of garden creatures isn't that bad.

Pacific Gold Mustard seeds germinating
On the whole, we'll sow our winter beds with a variety of cover and food crops - some sown directly into the soil and some started as transplants - with the intention of having some fresh food for the winter and healthy soil all around come spring.

Before planting anything, we remove the summer crops, dig in a 2" layer of finished compost and treat the bed with a dose of neem oil to smother overwintering pests and their eggs. 

Then we get down to the business of fall -

Pacific Gold Mustard - sown direct in raised beds for a winter food crop and spring green manure + pest control for next year's tomatoes
Buckwheat - sown direct in a raised bed for green manure and weed control
Fava beans - sown direct in a raised bed for green manure and nitrogen fixing
Brussels sprouts - transplants installed in one half of a raised bed  for a late fall for winter food crop
Dill - sown direct in a raised bed between Brussels sprouts for a winter food crop and to repel pests from the Brussels sprouts
Garlic - sown from seed in one half of a raised bed for a 2013 summer crop and to repel pests and improve the flavor of Brussels sprouts


We still have summer crops saying their final goodbyes in a few spots, but once the temps drop consistently below 70 degrees, they'll come out and the remaining cool season plants will go in. 

Thus completing another summer season and starting a fall and winter season anew.

Bam.

Thursday, August 16, 2012

Gazpacho

So the situation is this:

It's super hot outside. You have two tons of tomatoes and probably some other things like cucumbers. It's approximately dinner time and the last thing in the whole wide world that you want to do right now is turn on the oven. People are hungry in your house.

I totally hear you.

This scenario unfolds often in our house in the summer months. And on these occasions, I have a handful of tried and true easy no cook recipes that also knock back the garden's bounty so that I fear less the rapping at my chamber door by the invading army of cucumbers.

The first garden taming recipe being gazpacho.

You know, cold tomato soup.

It's a delight. You add a swirl of good olive oil, some flakes of sea salt, a few fresh basil leaves and a little garlic toast or Parmesan crisp on the side and I would be willing to do unspeakable things for it.

I won't turn on the oven, but the unspeakable things part is still up for grabs. I also save myself the labor intensive multi-batch blending scenario by just throwing all the vegetables, quartered, into the food processor because all that chopping seems like something a machine should be doing.

Let the machines do the jobs for which they were intended, I say.

I hope you'll try out the recipe on a hot summer's night and delight in its goodness.

Though the unspeakable things are optional. Fun! but optional.

Gazpacho

Ingredients
6 large tomatoes from your garden, quartered (I don't peel or seed them first)
3 small green bell peppers, cored/quartered
1 yellow onion, peeled, quartered
1 cucumber, peeled/halved/seeded/quartered
3 cloves of garlic, peeled
1/3 cup white wine vinegar
4 T extra virgin olive oil
1 stale french bread roll
Salt and pepper

To make
Throw the tomatoes, bell pepper, onion, cucumber and garlic into your large food processor (I love my 14 cupper) and blend until you have a soupy consistency. Add the vinegar and olive oil and blend until smooth.

Pour into a large bowl and season with salt and fresh cracked pepper to suit your preferences. Refrigerate it for an hour or more. 

Serve it up with some fresh basil,  a cucumber garnish, a swirl of olive oil, some flakes of beautiful sea salt, a strip of crispy bacon, a Parmesan crisp - whatever blows your hair back. 

Good eating.

Saturday, August 4, 2012

Tomato Pesto Pie with Spicy Sausage

About seven years ago I came across a blog that changed my life forever. 

About a year after that I came across a recipe on that blog that has changed my eating life forever.

That blog is Farmgirl Fare and that recipe is her Savory Tomato, Mozzarella and Basil Pesto Pie with Easy Cheesy Biscuit Crust.

It may have just been called Savory Tomato Pie back then, but I can't be sure. I just know that it was the best thing I'd ever eaten and, after that, I wanted all food to taste like that.

You should also know that I have a thing for all food in pie form, so that was in its favor, too.

I've made this pie every single year since, from the homegrown tomatoes that come out of my kitchen garden, and it has never been anything other than awesome. 

Of course, because I can't leave well enough alone, I also decided to make one change to the recipe that soothes the meat loving souls in my household: the addition of spicy Italian sausage.


I love the pie both ways - let me be truthful - but the addition of the sausage sends me to another planet of food happiness.

Have a nice trip.


Tomato Pesto Pie with Spicy Sausage
Recipe from Farmgirl Fare with my additions and changes in bold

For the pesto
(You can also buy pre-made pesto. I will not judge you)
Makes about 1½ cups (you'll need 1 cup for this recipe)

When portioning out basil (and so many other ingredients), it works best if you weigh it rather than pack it into measuring cups.

1/3 cup (about 1½ ounces) roasted & salted whole almonds
3 to 6 large cloves garlic, peeled
4 ounces fresh basil leaves (about 4 cups packed)
1 ounce (about 1/2 cup) finely grated Parmesan
1/2 teaspoon salt
1/3 cup extra-virgin olive oil, or more if desired

In the bowl of a food processor, use the S-blade to whiz the almonds and garlic until finely chopped.

Add the basil, cheese, and salt, and process until thoroughly combined and the consistency you like.

With the motor running running, slowly drizzle the olive oil through the chute. Salt to taste and add more olive oil if desired. Store your pesto in the refrigerator for several days or freeze it. A light coating of olive oil over the top of the pesto will help keep it from discoloring.


Heat the oven to 375°.

For the crust
2 cups organic all-purpose flour
4 teaspoons baking powder (make sure it's fresh!)
1 teaspoon salt
1/2 cup (1 stick/ 4 ounces) cold butter
1 cup (about 2-1/2 ounces) finely grated Pecorino Romano (or other hard cheese, such as parmesan)
3/4 cup milk

Combine the flour, baking powder, and salt in a medium bowl. Mix in the butter using a pastry blender, fork, or your fingers until the largest pieces are pea-size. Stir in the Pecorino Romano.

Pour in the milk and use a fork to gently form a soft dough. Do not overmix. Divide the dough in two pieces, making one slightly larger than the other.


On a generously floured surface, use a rolling pin to gently roll out the larger piece of dough into a circle about 12 inches across, rolling from the center outward. Sprinkle dough with flour if sticky.

Gently fold the dough in half and transfer into a 9-inch pie pan. If the dough tears, simply press it back together with your fingers.

Roll out the remaining piece of dough into a slightly smaller circle and set aside (or wait until you have the filling in the pan and then roll it out).


Assembling the pie:
1 cup pesto, divided
2½ pounds of the best plum tomatoes you can find, sliced lengthwise into 4 or 5 slices each
8 ounces shredded mozzarella
1/2 cup (about 1¼ ounces) finely grated Parmesan
About 12 ounces crumbled and cooked spicy Italian sausage

Using a spoon, spread 1/2 cup of pesto over the bottom layer of dough in the pie pan. 


Layer about half of the tomatoes over the pesto.


Layer half of the sausage over the tomatoes. 


Cover the tomatoes with about 2/3 of the mozzarella.


Layer on the rest of the tomatoes (you may not need them all to fill the pan). Carefully spread the remaining 1/2 cup of pesto over the tomatoes. 


Add the other half of the Italian sausage here. Cover with the remaining mozzarella and the Parmesan.


Roll out the second piece of dough if you haven't already, and carefully place it over the pie. Fold the edge of the bottom piece over the top piece and press together to seal.


Use your fingers to make a crimped design around the edge. If any dough falls apart, simply press it back together with your fingers. Don't worry if it isn't perfect. The handmade look has much more charm.

Cut four slits in the top of the pie for steam to escape. Bake at 375° in the center of the oven until the crust is golden brown, about 40 minutes. Cover the edge with foil if it starts to brown too quickly.


Let cool on a wire rack for at least 15 minutes before serving. Crust edges may be sampled much sooner. (As with nearly any fruit pie, if you cut into it while it's still warm, some juice will seep out. If you plan to store any leftover pie right in the pan, simply drain off the juice so the bottom crust doesn't become soggy.) Or cool pie completely, cover, and refrigerate.

With sausage
Without sausage

You can also freeze this pie. I wrapped a hunk in foil then put it in a zipper freezer bag and tossed it into the freezer. I defrosted the whole piece overnight in the refrigerator, then cut it in half and reheated the slices in my beloved toaster convection oven (that I use every day) for 15-20 minutes at 325°, each on a fresh piece of foil and covered lightly with the foil so the tops wouldn't brown too quickly.

Hint: If you plan to freeze the entire pie and don't want to freeze it in the pan, use a disposable pie pan or line your pan with a piece of heavy duty foil so you can simply lift the whole cooled pie out of the pan.

You can also make pie pockets. This also freezes well. Double score!


Wednesday, July 4, 2012

The Best Sauce Ever. Yep.

I know it sounds like big talk - just having one tomato sauce recipe for every purpose, but I tell you, it's just that good. In fact, it's known in my house as The Best Sauce Ever. Yep. and I believe that it is. 

I've used this sauce to toss with pasta, gnocchi, in lasagna, in eggplant Parmesan, over ravioli, mixed with chopped greens like chard and kale, simmered with some meatballs and - I won't lie to you - I've even just eaten it with a spoon.

For the past five years I have loved no other tomato sauce and life has been great.

I dare you to make this sauce with your homegrown tomatoes and then try to tell me it's not the tastiest tomato sauce you've ever eaten. 

I DOUBLE DARE YOU.

The Best Sauce Ever. Yep.

Ingredients:
4-5 large ripe fresh garden tomatoes, sliced into 1" rounds
4 good sized fresh basil leaves
1 head of garlic, top chopped off
1/3 cup red wine (I usually use a Cabernet)
Kosher salt
Fresh ground pepper
Extra virgin olive oil

To make:
Preheat oven to 450.

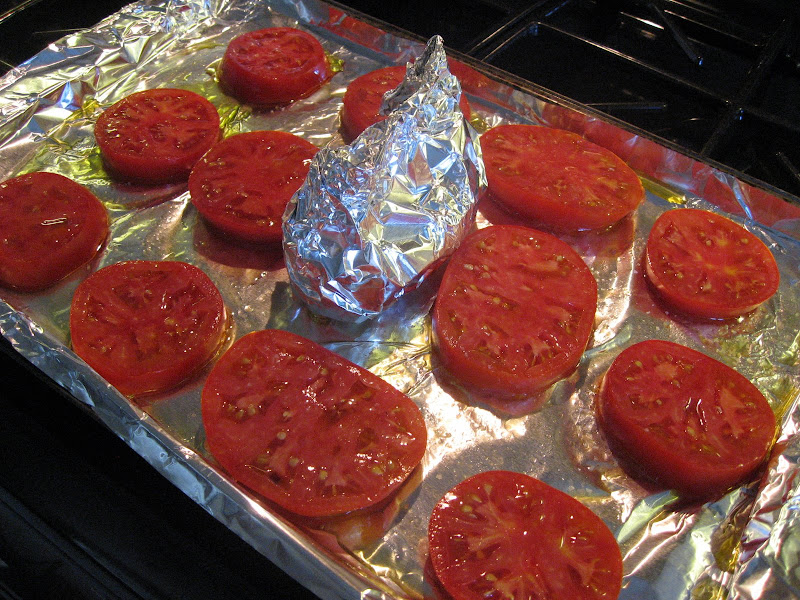
Cover a rimmed baking sheet with foil and then coat the foil with some olive oil. 


Place the prepped garlic head on another piece of foil and drizzle some oil on the top cut end of the garlic and add a bit of salt. Wrap the foil around it into a nice package. Put it in the middle of the baking sheet.

Place your tomato rounds in a single layer on the baking sheet around the garlic. Drizzle all the tomatoes with olive oil, salt and pepper. 


Roast it all into the oven for 30 minutes.


That blackness is what you want to see when you take the tomatoes out of the oven.

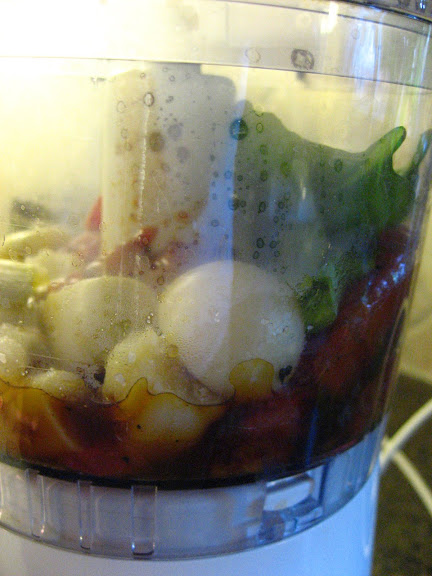
Pull out the food processor and add all the tomatoes (they'll be a bit charred and maybe a little grabby when trying to peel them from the foil - try hard). Unwrap the garlic and squeeze in the cloves (they'll be like paste - it's cool). Add the wine, basil and salt/pepper as you like it.


Puree the whole mess until it's one even consistency and no giant basil bits are jamming around in there.


Like I said before, you can toss it with some pasta, stew it with some meatballs, add a bit of cream and serve over gnocchi - seriously, whatever. Or just eat it out of the Cuisinart with your spoon because it's so good you won't care that you just ate sauce for dinner while standing in the kitchen.