Showing posts with label 1. Coaching for January. Show all posts

Wednesday, January 29, 2014

How to start seeds like a pro

*Excerpt from our monthly coaching update*

 
Each type of vegetable has its own set of rules for getting growing and some of them have a bit more wiggle room with those rules. Here's a list of the most popular homegrown vegetables and how to start them from seed so that you actually end up with the vegetables that you want. 

FYI: We're using the last frost date of March 1 to determine when to start the seeds in NorCal.

A list of equipment for starting seeds indoors is at the end, so just keep a readin'. 

Basil
How to sow: Direct in the garden soil lightly covered with soil or start indoors 3-4 weeks prior to transplanting outdoors by surface sowing (don't cover) and keeping mo-ist
When to start: 2/1/14 indoors, after 3/1/14 outdoors 
What to expect: Germination in 5-10 days

Beans (Pole)     
How to sow: Direct in the garden soil, 1" deep, 3 seeds per pole
When to start: End of February or after soil temps have exceeded 60 degrees, so after it's been 60 degrees during the day for a week or more 
What to expect: Germination in 3-7 days. Climbing the trellis within a month of germination.
  
Beets 
How to sow: Direct in the garden soil, 1/2" deep, 3-4 seeds/inch, no need to thin
When to start: After soil temps have exceeded 45 degrees. So, like, whenever you want in NorCal.
What to expect: Germination 7 days, young greens in 2 weeks
  
Carrots
How to sow: Direct in the garden soil, lightly covered with soil, 30 seeds/ft, DO NOT LET SEEDS DRY OUT
When to start: End of February or after soil temps have exceeded 60 degrees, so after it's been 60 degrees during the day for a week or more 
What to expect: If moisture is kept consistent and temperatures warm, germination within 1-3 weeks (yes, they take forever to germinate)

Corn
How to sow: Direct in the garden soil, 1" deep, 1 seed/hole, in blocks of 4 rows (for pollination to occur)
When to start: End of March or after soil temps have exceeded 65 degrees, so after it's been 65 degrees during the day for a week or more 
What to expect: Germination in 7-14 days

Cucumbers
How to sow: Direct in the garden soil, 1" deep, 4-6 seeds per mounded hill
When to start: End of February or after soil temps have exceeded 60 degrees, so after it's been 60 degrees during the day for a week or more  
What to expect: Germination in 7-14 days

Eggplant
How to sow: Start indoors with bottom heat and supplemental light to 12 hours/day, 1/4" deep, 1 seed/cell
When to start: 1/11/14 or 8-10 weeks before last frost
What to expect: Germination in 10-21 days

Kale
How to sow: Direct in the garden, lightly covered with soil to 1/4"
When to start: Early spring for a spring/summer crop
What to expect: Germination in 10-21 days

Lettuce
How to sow: Direct in the garden, lightly covered with soil to 1/4" according to the depth indicated on the package
When to start: After February 1, while temperatures are still cool
What to expect: Germination in 7-10 days

Melons
How to sow: Direct in the garden soil, 1/2" deep, 4-6 seeds per mounded hill
When to start: End of February or after soil temps have exceeded 60 degrees, so after it's been 60 degrees during the day for a week or more 
What to expect: Germination in 7-10 days

Peas
How to sow: Direct in the garden soil, 2" deep, 6" apart
When to start: Early spring for a spring/summer crop
What to expect: Germination in 7-14 days

Peppers
How to sow: Start indoors with bottom heat and supplemental light to 12 hours/day, 1/4" deep, 1 seed/cell
When to start: 1/11/14 or 8-10 weeks before last frost
What to expect: Germination in 10-21 days

Squash
How to sow: Direct in the garden soil, 1/2" deep, 1-2 seeds every 3'
When to start: End of February or after soil temps have exceeded 60 degrees, so after it's been 60 degrees during the day for a week or more 
What to expect: Germination in 10-14 days

Tomatoes 
How to sow: Start indoors with bottom heat and supplemental light to 12 hours/day, 1/4" deep, 1-2 seeds/cell
When to start: 1/25/14 or 8-10 weeks before last frost
What to expect: Germination in 7-10 days
  
Seed starting equipment for indoor growing
Bottom heat: Heat mats
Trays: 11x22 tray
Flats: 72 cell flat
Grow lights: 4' fixture
Soilless mix: Seed starter mix


Tuesday, January 14, 2014

How to seed shop like a total pro

 
 *Excerpt from our monthly coaching update*
 
Digging yourself out from underneath a monster pile of gorgeous glossy seed catalogs? 
 
Yeah, it happens.
 
If you're staring down those catalogs with a mixture of anxiety, desire and straight up fear - take a read through our guide below so that you can seed shop like a pro and finally force those catalogs into doing good instead of evil for your vegetable seed shopping routine.
 
For noobs
1. If you're growing your first garden, first make a quick list of the vegetables you like to eat. 
2. Then, next to each crop, write in their sunlight and space requirements
3. Then cross off any that need sunlight or space conditions that you just don't have. Be honest with yourself here. "Full sun" means 6-8 hours of direct sunlight per day, not four. You won't be happy with a big beefy tomato grown in four hours of sunlight/day because you won't get any big beefy tomatoes. Instead you'll have leggy weak plants with a few fruitless flowers. Just sayin'.
4. With your list of crops, leaf through those catalogs and choose varieties of those crops that you want to try out. 
5. Order, plan your planting schedule, get ready to live.

For vets
1. If you have grown a garden every year and you already have your catalogs piled up ready to go, first make a quick list of the vegetables and varieties you grew this year and the plant family they belong to. 
2. Next to each crop, write in whether you'd want them again next year or would rather have a different variety or none of this crop at all. Cross off all the crops you don't want to grow again.
3. Then for all the crops you do want to grow again, next to each crop, note whether you have seeds from last year. Most seeds will keep for up to three years even with lackluster care (like they're sitting on your potting bench in the garage all exposed to temperatures and light and whatever). 
4. With your list of crops, leaf through those catalogs and choose varieties of those crops that you want to try out, keeping in mind that when you get ready to plant, you should only put a crop family where there was a different crop family last year. So, if you grew tomatoes (Solanaceae) in a spot last year, don't plant them in this space again this year. Instead, try a Brassicaceae or Asteraceae crop in its place.
5. Order, plan your planting schedule, get ready to live.

For impulse shoppers
Follow the "For noobs" or "For vets" guide depending on which you are, except your #1 rule is DON'T OPEN THAT CATALOG WITHOUT GOING THROUGH THE STEPS FIRST. Also, don't seed shop while you're hungry. Seriously. Bad things happen.

For alleged black thumbs
Follow the "For noobs" or "For vets" guide depending on which you are, except that when you get to choosing varieties, go for hybrid varieties, those with "F1" in their names and ones with listed disease resistances. These are going to be bred for success and are less susceptible to cooties and failure than their heirloom or non-hybridized brethren. 
 
Also, it wouldn't hurt to go back to your list and be brutally honest with yourself about your sunlight and space conditions. If you had a tomato plant that never produced or ripened fruit, melons that never set flowers, cucumbers that never vined - you probably aren't getting enough sunlight. Try plants that grow in Part Sun conditions and you'll have a better chance of success in 2014. 

Now, go! Seed shop like a pro, plant for success and, if you want some guidance on when and how to start those seeds, subscribe to our monthly coaching update because *maybe* that's the next topic on the docket...

Just maybe.


Thursday, January 31, 2013

Is this a weed? YES. PULL IT NOW.

Suddenly, it's 60 degrees outside. After weeks of frost, overnight temperatures in the 30s (and 20s in some Bay Area places - yikes) and daytime highs barely scratching the 50s.

Everyone and everything says YAY.

YAY FOR THAT.

The bummer is that we're not the only ones who noticed the new warm temps.

The weeds are on to us.

Did someone say, "sunshine"? [WEED. PULL IT NOW.]

The garden is, too, which is nice, but if I want to keep the newly-excited-that-it's-warm weeds from taking over the barely-cracking-the-surface garden plants as they shake loose the cold winter soil from their tiny limbs - I better get to weeding.

Sun? YES, PLEASE. (Sweet peas are NOT a weed.)
But what's a weed?

Crab grass IS a weed.
I'm not going to get all philosophical on you, here, so don't worry. Good news is that when it comes to growing vegetables, it's pretty easy to tell what's a weed and what's a food because there's none of that grey area about "Well, that is sort of pretty, so we'll just let it grow and see what it is."

No.

There's no room for "Let's see what it is" when you're growing vegetables. It's either a vegetable, a flower that you planted on purpose or a weed.

And the weeds must go. And some of the flowers if they're getting all WE OWN THIS PLACE on  you.

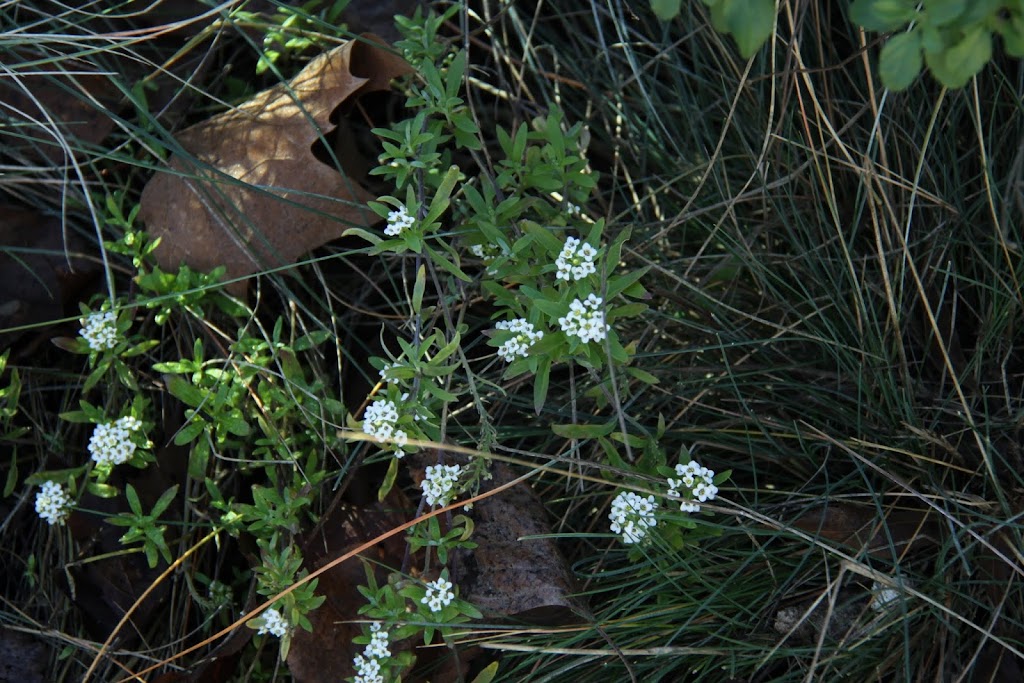
I'm looking at you, Alyssum.

Dietes seedlings ARE weeds (the little pointed sprouts). PULL THEM NOW.

So, do a little yard reconnaissance this early spring and get out to the vegetable garden and your yard and pull out the not-food and not-purposefully-planted flowers so that they don't turn into huge nutrient-sucking pest habitats, OK?

Just say yes. You'll be glad you did.

Not weeds:
California Poppies
Borage
Alyssum
Mustard
Dill

WEEDS:
Dandelion
Lamb's Quarter
Oxalis (clover)
Purple flowering weed

Crab grass

If you haven't gotten enough here and want to go on a weeding rampage in your garden (we like you so much), more photos of all of the above are on our Pinterest boards.

Good hunting.

Thursday, January 24, 2013

Build a raised garden bed


When we first set up the test garden in Silicon Valley, before it was the test garden and just the garden, we built two raised beds out of scrap lumber and a handful of hardware from the miscellaneous jar in the garage.


It wasn't super specific or technical or difficult or expensive. The only mandatories were that it be sturdy, durable and not hideously ugly.

I have standards, after all. Can't have plants growing in a wonky fugly raised bed that falls apart after one season - that would be wrong.

So, setting out with a vague design in mind, we created these first two beds with four sturdy posts sunk into the ground and 2x12 boards bolted to the outsides of the posts. Simple, durable and not terribly ugly. Then we added a bed each year, stopping at four.

The vegetables seem fine with it.


Until this year.

This year the test garden got a fifth bed so that we could expand our operation to include some new crops and so that we could have a bit more flexibility in the crop rotation.


Put me in, coach!


I mean, it's not like we're going to have a year where we *don't* grow tomatoes, after all. That's just the talk of the crazy, right there.

And because the process of building these beds is pretty simple and we get a good number of questions about how these things are built and is it hard and how do they hold up and so on, we thought a video would be a good idea.

Also, you know, it's an awesome way to grow vegetables, and we're sort of about that.

So, if you've always wanted to grow vegetables in a raised bed, this post is for you.  Watch the video, print the materials list (hit print at the bottom of the post and you can delete anything you don't want before printing), get nuts and grow something.

Build a raised bed


Materials:
3 2x12 Redwood boards (or other untreated lumber) cut into 2 8' sections and 3 3' sections (one won't be used for the beds)
1 4x4 post cut into 1 1/2' sections
16 lag bolts (corresponding size to the washers)
16 Fender washers (corresponding size to the bolts)

Tools:
Battery operated drill and/or corded drill (If you're using just a battery operated drill, have your battery fully charged before you start and, if you have one, charge that second battery while you work.)
Drill socket bit (corresponding size to the bolts)
Socket wrench
Socket bit for the wrench (corresponding size to the bolts)
Pencil
Tape measure
Bar clamp
Trenching shovel
Small mallet (optional)
Trowel (optional)
Level (optional, but oh so nice)

Time: About 2 hours start to finish

How to: Well, watch the video to be sure, but a quick summary of the steps...

Step 1: Build the bed end pieces
Attach one 1 1/2' 4x4 section to each end of one of the 3' 2x12 pieces with two washers and lag bolts apiece. Drill pilot holes before installing the bolts and washers so you don't have to blast through all that wood with just the bolts and the waning power of your battery operated drill.

Make two of these end pieces.

Step 2: Go out to the garden and dig the holes for the 4x4 posts

Set your completed end piece where you plan to place your bed and use it to determine where to dig your post holes. The idea is that you'll dig holes deep enough to keep the bed snug and sturdy in the ground, so you want the posts to sink deep enough so that the end board lies flat against the ground.

Drop one end piece in the ground and backfill the holes with enough soil that it will stand upright and level on its own.

Step 3: Use the 8' boards to determine where to set the second end piece

Prop the 8' boards against your set and finished end piece to determine where to dig the holes for your second end piece. You can also measure with the tape, but we've found this is the easiest way to get the fit just right without having to mess about with fixing the holes and such.

Just trust me on this one.

Once you've determined where to dig the holes, dig the holes. Right? Right. Then place the second end piece in the holes and backfill it with soil just like you did the first.

Step 4: Attach the 8' boards to the sides and finish the bed

Prop one of the 8' boards against the side of the end pieces, drill pilot holes for your bolts (two per corner) and then install the bolts and washers - eight bolts and washers in total.


You're done.


Fill it with soil, plumb it for irrigation if that's what you're into and get to planting something fabulous.

Bonus project: Make a garden bench with that leftover 3' section


If you build two of these beds and leave yourself about a foot between the beds, you can make a garden bench out of that leftover 3' section by screwing four short lag bolts (you don't want them to go all the way through the board) at the four corners so that it will sit snugly over the sides of the beds.


Of course, this means that you're going to need two raised beds, but I'm here to tell you that one is not enough. Or four. Or, probably, five...