Showing posts with label Coaching for August. Show all posts

Tuesday, August 13, 2013

Eat your summer


You ready to knock back that encroaching garden for dinner tonight?

Good. Here we go.

Go out to that garden/farmers' market/neighbor's yard/whathaveyou with a big basket or bucket (shallow and wide is better than tall and deep) and gather up:

A handful of tomatoes
A few zucchini, crookneck or other summer squash that desperately needs a talking to
A bunch of basil
Some oregano

Return to your kitchen with yellowish green fingernails and a better lease on life to rinse your vegetables and get on with this whole dinner thing.

Before you start chopping away, gather up the other non-vegetable gardeny things like GOOD olive oil, Parmesan cheese (finely shredded), mozzarella (sliced into rounds) and some good salt. I'll let you decide what constitutes "good" salt in your house, but I like grey salt, sea salt, pink salt, black lava salt - even kosher salt. Pretty much anything that's not just straight table salt because, well, I don't have that in my house.

My poor table.

Anyway - let's make dinner.

Slice the tomatoes into 1/2" rounds, the squash into long 1/2" thin strips, pluck the basil leaves from their stems and strip the oregano from its stem and finely chop. Ooh la la!

Happiest cutting board in the west.
Go grab a nice oven safe dish. Glass works nicely, but whatever you've got will do fine. Crank that oven to 400 degrees and set up your dish to start loading in the summer garden.

First, give the bottom of the dish a good dose of olive oil and a bit of salt. This will keep the whole glorious thing from sticking to the bottom, which is a total drag.

Then start the layering just like you would lasagna, but instead of noodles, you have squash strips. I'm sure you've seen/done this before, so it's not like I'm telling you anything new here BUT OH every time I make this from the crazy busty garden I feel like a hero.

Mostly because I no longer have a weight advantage over the zucchini and it scares me so this is my way of reminding it who's boss, but still. Whatever it takes to feel like a hero, am I right?

Anyway, layer thusly:

Olive oil > Zucchini strips > Tomato rounds > Basil leaves bottoms up

Then some Parmesan. See how the basil holds on to the cheese in its upturned cups? Yeah. You see.
Cupping!
Then add your sliced mozzarella right on there.
The cupping is still in effect
Then give it all a splash of the olive oil, salt and the Ooh la la stripped oregano.
Then do the layering all over again, finishing with a shingled basil layer, tops up this time.
Mmm...basil shingles. That's gooooooooooooood shingling.
And don't forget the rest of the cheese and whatever oregano's still lying around for the tippy top.
That's a tower of I WIN right there.
Cover with foil and bake the whole deal in your 400 degree oven for about 30 minutes or until the juices are abubblin' (this is where it helps to use a glass dish, so you can just look in there and see the abubblin' without having to take off the foil and maybe burn your face/hand off - just saying) and then remove the foil altogether and let it bake for another 10 minutes or until the cheese is browned a bit on top.

Let it cool for a few minutes if you can and then slice into it and serve it with a fresh basil leaf on top because that just screams FRESH GARDEN GOODNESS right in your face, does it not?

IN THE FACE
A garden take down never tasted so good.

Wednesday, August 29, 2012

Zucchini cupcakes

I've found the best way to get rid of loads of squash (zucchini, crookneck, whathaveyou) is to shred it and put it into chocolate cake.

Because everyone loves chocolate cake and since they don't know that there's evil squash inside, they eat it all up like WOO CHOCOLATE CAKE and I go WOO THE SQUASH IS GONE and then WOO MY PANTS FEEL TIGHT because I love chocolate cake, too. Whoopsy.

But the satisfaction I get from stowing two or three huge squash in something that will be readily disposed of is extreme, and so I carry on. Let's hope my jeans make it through squash season. 

Wow. That's something I've never said before. 
 
Moving on...

If you want to hide all your squash in a cake (and let's face it, who doesn't? It's very fun.) try this recipe from my favorite use-all-your-garden-vegetables cookbook, Serving up the Harvest by Andrea Chessman.

Dark Chocolate Zucchini Cupcakes
Adapted from the Dark Chocolate Zucchini Bundt Cake recipe
in Serving up the Harvest, Andrea Chesman

Ingredients
2 1/2 C flour
3/4 C unsweetened cocoa powder
2 t baking powder
1 t baking soda
1 t salt
1/2 t ground cinnamon
2 C brown sugar (make sure you have this before you make the whole recipe)
1/2 C butter
2 eggs
2 oz baking chocolate, melted + cooled
1 t vanilla extract
1 C coffee
3 C grated squash (WOO!)
 
 
To make
Preheat oven to 350.

Grease your cupcake tins (this made almost 2 dozen) in whatever fashion suits you.

Sift the flour, cocoa, baking powder, baking soda, salt and cinnamon in a bowl. And really sift it using a sifter or something because it mixes it nice and gets rid of lumps. No one wants to eat a lump of baking powder, y'all. That's nasty.
 
No lumps. That's all I ask.
Beat together the brown sugar and butter in a mixer and add the eggs one at a time until they're combined. Add in the chocolate and vanilla until combined and then switch off adding the coffee and flour mixture until it's all in there. Scrape down the bowl and then mix in the squash. 

Pour the whole mess into the cupcake tin and bake for approximately 30 minutes or until the toothpick does the Coming Out Clean thing. 

Allow to cool and watch for Cupcake Monsters that do this:
 
Cupcake monsters are the worst kind of monsters.
And then, once they're cooled and you want to impress people, add some powdered sugar to the top to be fancy. If you want, you can use the fancy method I learned while standing in line at the store.

See, as I was buying the brown sugar I thought I had but didn't and was soothing my aggravated soul with a free sample reading of Real Simple, I came across this month's New Uses for Old Things that was to use a tea ball to shake powdered sugar over things. 

I do believe I said aloud to myself: YES. I WILL DO THIS. 

And then I did. See below.
 
Works like a charm.
But, if you're just going to be shoving all the cupcakes into a zippy bag and taking them to work to pawn off on your coworkers who still fit in their jeans, feel free to ditch the fancy sugar and just leave them plain. They're still real good. Promise. I even ate one in the car to prove it - so there.

Now go love on your zucchini. GO.

Thursday, August 16, 2012

Gazpacho

So the situation is this:

It's super hot outside. You have two tons of tomatoes and probably some other things like cucumbers. It's approximately dinner time and the last thing in the whole wide world that you want to do right now is turn on the oven. People are hungry in your house.

I totally hear you.

This scenario unfolds often in our house in the summer months. And on these occasions, I have a handful of tried and true easy no cook recipes that also knock back the garden's bounty so that I fear less the rapping at my chamber door by the invading army of cucumbers.

The first garden taming recipe being gazpacho.

You know, cold tomato soup.

It's a delight. You add a swirl of good olive oil, some flakes of sea salt, a few fresh basil leaves and a little garlic toast or Parmesan crisp on the side and I would be willing to do unspeakable things for it.

I won't turn on the oven, but the unspeakable things part is still up for grabs. I also save myself the labor intensive multi-batch blending scenario by just throwing all the vegetables, quartered, into the food processor because all that chopping seems like something a machine should be doing.

Let the machines do the jobs for which they were intended, I say.

I hope you'll try out the recipe on a hot summer's night and delight in its goodness.

Though the unspeakable things are optional. Fun! but optional.

Gazpacho

Ingredients
6 large tomatoes from your garden, quartered (I don't peel or seed them first)
3 small green bell peppers, cored/quartered
1 yellow onion, peeled, quartered
1 cucumber, peeled/halved/seeded/quartered
3 cloves of garlic, peeled
1/3 cup white wine vinegar
4 T extra virgin olive oil
1 stale french bread roll
Salt and pepper

To make
Throw the tomatoes, bell pepper, onion, cucumber and garlic into your large food processor (I love my 14 cupper) and blend until you have a soupy consistency. Add the vinegar and olive oil and blend until smooth.

Pour into a large bowl and season with salt and fresh cracked pepper to suit your preferences. Refrigerate it for an hour or more. 

Serve it up with some fresh basil,  a cucumber garnish, a swirl of olive oil, some flakes of beautiful sea salt, a strip of crispy bacon, a Parmesan crisp - whatever blows your hair back. 

Good eating.

Wednesday, August 8, 2012

Coaching session: Garden tracking

Everyone can take advantage of this coaching session right here from the blog. No need to book a session!

Like my 1:1 onsite coaching sessions, you'll focus on one aspect of kitchen gardening and learn the specific skills and techniques for mastering it.

In the case of garden tracking, you'll learn how to set up your own garden tracker and establish tracking methods to record your garden's harvests and determine its value. Right here, right now.

You'll learn how to:
1. Access and use the template
2. Customize it for your own use
3. Weigh and track your harvests
4. Assess the true value of your harvests

Tracking your harvests may seem like a tedious task that's not really worth the effort as long as you're able to go out and pick a tomato from time to time, but there's so much more that your garden has to tell you if you take the time to keep track of what's going into and coming out of it.

I've been keeping a garden tracker for four years, dutifully noting each crop that I sow, the cost of planting my gardens and then the yields of each crop and it's been an eye-opening experience to say the least.


Lesson learned: Herbs weigh nothing.

Tracking my garden has helped me learn:
    • How much I spend to install and maintain my garden
      I can be prepared for future seasons and know where to invest.
    • How much my produce is worth per pound
      So that I can see which crops are worth growing and which are worth buying.
    • How much I'm saving by growing my own versus buying it
      So I can justify growing my own rather than going to the store all the time.
    • How many pounds of produce I grow
      This has helped me decide when to expand my garden, change what I grow or how much of any one crop to grow. This is also how I decided to never grow corn again, why I'll always grow tomatoes and how valuable our cherry tree is.
    • The yields of different plants
      I've been able to understand how many plants I need for preserving and how many to plant when I want to increase or decrease the amount of food on hand.
    • My soil test results
      Understanding my soil's needs has helped me to build the healthiest soil for my garden and decode the reasons why some seasons are better than others.
Lesson learned: Tomatoes are heavy valuable crops.

By maintaining my tracker each year, I've been able to see all of that information, plus: 
    • Annual averages of cost, value, yields and savings
      I know how much I typically invest, what kind of harvests I can expect and my overall savings from growing my own food. It's incredible that $90 invested can result in over $1,700 worth of food.
    • Harvest times unique to my garden and climate
      I know when I'll be able to slice open a watermelon or make a platter of heirloom tomatoes for a party. Fourth of July has a whole new meaning in our house since it's usually when we get our first ripe tomato. 
    • Plant varieties that I grow
      There are never any mysteries about "What was that great filet bean we had?" or "Remember that single serving size melon? It was so good that I wish I knew what it was called!" when I go to order seeds in the winter because my tracker keeps all of that handy.
    • Plant performance
      I know which varieties do well and what their yields are so that I don't over or under order when I buy seeds in the winter.
    • Impact of crops on soil condition
      I know what food and cover crops do to my soil so that I can properly rotate, amend and feed my soil what it needs to stay healthy.
Lesson learned: Sugar Baby watermelons are the perfect size for two servings.

But that's all well and good if you don't track your garden's harvests, so let's get started.
To track your harvests
To track your harvests using this method, you'll need a scale (this digital 11 pound scale is a good one), spreadsheet software (I like Google Spreadsheets - it's free and stored in the cloud so that I can make updates from anywhere) and a notebook.
Build your tracker
To get started, you'll want to first customize your spreadsheet with the vegetables you plan to grow this season. You can make a copy of this Google Spreadsheet (File > Make a copy) and then begin adding the following information from your garden: 
  1. Add the vegetables and fruits you are growing to the 'Tallies' and 'Harvest' tabs
    Make note of the varieties you're growing for future seasons.
  2. Add the farmers' market or grocery store prices to the 'Harvest' tab
    Don't forget to use prices for local and organic produce since they're usually higher than standard grocery store fare. Some sources for finding prices in your area are: 
     Kitchen Gardeners International, Rodale Institute, Whole Foods, Papas Organic and Food Co-op. I've also trolled my farmers market with my notebook and noted their costs as well as tripped through Whole Foods taking note of their prices. Don't be shy - this is your bottom line, folks.
  3. Add your planting and maintenance costs to the 'Sow' tab
    You'll update these costs as you go through the season, too, so don't just set it and forget it.
Plant your garden
Then plant your garden as you normally would, keeping track of any costs associated with planting, like extra watering for the vegetables, seeds, soil testing, amendments, seedlings, plant stakes and so on. 

For the sake of tracking watering, I take a baseline amount from a month's bill that doesn't involve a lot of yard watering. January works well because we don't water our outdoor plants in January. Then I subtract January's water bill amount from each month's water bill amount from the growing season to get the difference. That difference is my water cost for the garden and gets added to the tracker. 

Track your harvests
When your garden begins to produce, take one extra step between harvesting and eating to weigh the harvest of each vegetable and make a note in your notebook for later input on your own Garden Harvest Tracker.
My notebook has column headers for:
  • Vegetable
    Beans, tomatoes, cucumbers, etc
  • Ounces
    Most harvests don't weigh in as full pounds, so recording ounces is a better way to go
  • Number
    I like to know whether my tomato harvest that weighed in at 2 pounds was made up of two huge tomatoes or a dozen small ones
  • Date
    This way I can look back at previous seasons to see if I'm on track and also when my harvests will tend to run out for each plant

The tracker will calculate the total costs for sowing and growing your garden and how much it costs per pound to grow. It will also sum up the total pounds of your harvests over the season as well as the true harvest value of your garden after the expenses of sowing have been subtracted.
See the value in your garden
At the end of your first season you'll be able to see how cost effective it can be to grow your own vegetables and fruit. There are even some hidden values that don't show up on your tracker, like the exercise you get from gardening, the saving of fossil fuels because your vegetables didn't have to be transported from field to store and the variety of vegetables you're able to choose from when you're growing from seed.
This is my Garden Tracker in practice from 2009-2012 in Northern California. Just from looking at the first tab of the spreadsheet, which acts a roll-up of the seasons' productivity, you can see that last year I was able to harvest over 260 pounds of produce at an expense of only $60 for a harvest value of over $1,700. 
Holy mackerel, right?
Lesson learned: Cherry tomato plants produce about 15 pounds of fruit but take about 5 times as long to harvest as standards.

Some other nuggets I've gleaned over the years because of the tracker:
  • I tend to get about 50 pounds of tomato per standard tomato plant.
  • Corn is better to buy at the store since it depletes the soil, takes up a ton of room, costs a lot to grow and is super cheap to buy organically and locally.
  • I know that it takes me more than five seasons to go through my organic amendments.
  • I should grow other things on my bean tepee than just green beans because the harvests are overwhelming.
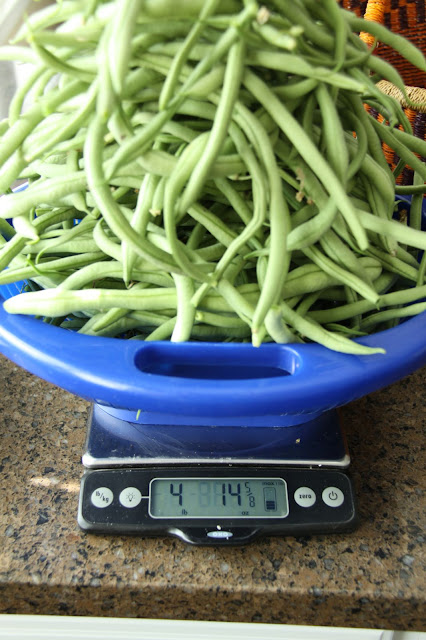
Lesson learned: Four pounds of green beans at one time is way more than one household needs.

Have more garden tracking tips to share? Think this is total bunk? Wondering about other steps in the process that seem mysterious? That's what the comments are for. I'd love to hear what you think. 

Happy tracking, y'all.


Saturday, August 4, 2012

Tomato Pesto Pie with Spicy Sausage

About seven years ago I came across a blog that changed my life forever. 

About a year after that I came across a recipe on that blog that has changed my eating life forever.

That blog is Farmgirl Fare and that recipe is her Savory Tomato, Mozzarella and Basil Pesto Pie with Easy Cheesy Biscuit Crust.

It may have just been called Savory Tomato Pie back then, but I can't be sure. I just know that it was the best thing I'd ever eaten and, after that, I wanted all food to taste like that.

You should also know that I have a thing for all food in pie form, so that was in its favor, too.

I've made this pie every single year since, from the homegrown tomatoes that come out of my kitchen garden, and it has never been anything other than awesome. 

Of course, because I can't leave well enough alone, I also decided to make one change to the recipe that soothes the meat loving souls in my household: the addition of spicy Italian sausage.


I love the pie both ways - let me be truthful - but the addition of the sausage sends me to another planet of food happiness.

Have a nice trip.


Tomato Pesto Pie with Spicy Sausage
Recipe from Farmgirl Fare with my additions and changes in bold

For the pesto
(You can also buy pre-made pesto. I will not judge you)
Makes about 1½ cups (you'll need 1 cup for this recipe)

When portioning out basil (and so many other ingredients), it works best if you weigh it rather than pack it into measuring cups.

1/3 cup (about 1½ ounces) roasted & salted whole almonds
3 to 6 large cloves garlic, peeled
4 ounces fresh basil leaves (about 4 cups packed)
1 ounce (about 1/2 cup) finely grated Parmesan
1/2 teaspoon salt
1/3 cup extra-virgin olive oil, or more if desired

In the bowl of a food processor, use the S-blade to whiz the almonds and garlic until finely chopped.

Add the basil, cheese, and salt, and process until thoroughly combined and the consistency you like.

With the motor running running, slowly drizzle the olive oil through the chute. Salt to taste and add more olive oil if desired. Store your pesto in the refrigerator for several days or freeze it. A light coating of olive oil over the top of the pesto will help keep it from discoloring.


Heat the oven to 375°.

For the crust
2 cups organic all-purpose flour
4 teaspoons baking powder (make sure it's fresh!)
1 teaspoon salt
1/2 cup (1 stick/ 4 ounces) cold butter
1 cup (about 2-1/2 ounces) finely grated Pecorino Romano (or other hard cheese, such as parmesan)
3/4 cup milk

Combine the flour, baking powder, and salt in a medium bowl. Mix in the butter using a pastry blender, fork, or your fingers until the largest pieces are pea-size. Stir in the Pecorino Romano.

Pour in the milk and use a fork to gently form a soft dough. Do not overmix. Divide the dough in two pieces, making one slightly larger than the other.


On a generously floured surface, use a rolling pin to gently roll out the larger piece of dough into a circle about 12 inches across, rolling from the center outward. Sprinkle dough with flour if sticky.

Gently fold the dough in half and transfer into a 9-inch pie pan. If the dough tears, simply press it back together with your fingers.

Roll out the remaining piece of dough into a slightly smaller circle and set aside (or wait until you have the filling in the pan and then roll it out).


Assembling the pie:
1 cup pesto, divided
2½ pounds of the best plum tomatoes you can find, sliced lengthwise into 4 or 5 slices each
8 ounces shredded mozzarella
1/2 cup (about 1¼ ounces) finely grated Parmesan
About 12 ounces crumbled and cooked spicy Italian sausage

Using a spoon, spread 1/2 cup of pesto over the bottom layer of dough in the pie pan. 


Layer about half of the tomatoes over the pesto.


Layer half of the sausage over the tomatoes. 


Cover the tomatoes with about 2/3 of the mozzarella.


Layer on the rest of the tomatoes (you may not need them all to fill the pan). Carefully spread the remaining 1/2 cup of pesto over the tomatoes. 


Add the other half of the Italian sausage here. Cover with the remaining mozzarella and the Parmesan.


Roll out the second piece of dough if you haven't already, and carefully place it over the pie. Fold the edge of the bottom piece over the top piece and press together to seal.


Use your fingers to make a crimped design around the edge. If any dough falls apart, simply press it back together with your fingers. Don't worry if it isn't perfect. The handmade look has much more charm.

Cut four slits in the top of the pie for steam to escape. Bake at 375° in the center of the oven until the crust is golden brown, about 40 minutes. Cover the edge with foil if it starts to brown too quickly.


Let cool on a wire rack for at least 15 minutes before serving. Crust edges may be sampled much sooner. (As with nearly any fruit pie, if you cut into it while it's still warm, some juice will seep out. If you plan to store any leftover pie right in the pan, simply drain off the juice so the bottom crust doesn't become soggy.) Or cool pie completely, cover, and refrigerate.

With sausage
Without sausage

You can also freeze this pie. I wrapped a hunk in foil then put it in a zipper freezer bag and tossed it into the freezer. I defrosted the whole piece overnight in the refrigerator, then cut it in half and reheated the slices in my beloved toaster convection oven (that I use every day) for 15-20 minutes at 325°, each on a fresh piece of foil and covered lightly with the foil so the tops wouldn't brown too quickly.

Hint: If you plan to freeze the entire pie and don't want to freeze it in the pan, use a disposable pie pan or line your pan with a piece of heavy duty foil so you can simply lift the whole cooled pie out of the pan.

You can also make pie pockets. This also freezes well. Double score!


Wednesday, August 1, 2012

Arugula pesto

While arugula is no tomato, it is a fine winter green that satisfies my need to have a decent salad regardless of the weather outside. In the summer, I make salads almost entirely from my tomatoes and, I think, I'll be making my winter salads mainly from arugula for many future winters.

Arugula is so easy to grow, delicious and lends itself to things other than salad. It's diverse, people. Dynamic. Flexible.

It is the tomato of the leafy green world.

If you don't believe me, let me tell you all the things I've done with this easy crop that grew abundantly from one (one!) packet of $.99 seeds:
  • Swapped it for basil in Thai Chicken Soup 
  • Put it on pizza
  • Added it to tomato soup
  • Used it as greens in a million salads
  • Made arugula pesto
  • Added it to rice noodles
  • Ate it straight from the garden
  • Slid it into sandwiches instead of limp lettuce
  • Chopped it up in tuna salad
  • Froze it into cubes for future use

Really now. That's a lot of work for one packet of seeds that ended up taking very little room in my garden.The space I planted was about 2'x2'. And all the water it needed came from The Sky. Plus, it didn't even balk at frost, wind, cold or rain. And when I harvested it and then let it sit in the sun in a big black bucket for 4 hours, it perked right back up when I rinsed it in the sink under cool water.


If nothing else, it's resilient. And good for you, too.

All good reasons to love this crop and then maybe grow it on your own. And, if you're brave enough to try something as exotic and bizarre as pesto made from something other than basil (Thank you to Farmgirl Susan for this arugula pesto recipe), try it out.

Oh yes, you want this.

Treat it as you would any delicious pesto - spread it on something, stir it into some pasta, swap it for your usual sauce on pizza, dip something in it or just eat it with a spoon.


Now that we're all Arugula Wise, we can do whatever we want, including making whole salads from this one green and then also making pesto from it while we miss tomatoes. And basil. And fresh corn. OH! And green beans!

You get the idea.