Showing posts with label Corn. Show all posts

Thursday, January 1, 2015

Coaching for January

So, who's stoked for the spring garden season to begin? If you're frantically waving your hand around, you're in luck because it has begun!

No, really.


And if you're planning to grow crops like tomatoes, peppers, eggplant or anything from seed that says "Sow indoors" on the packet, your time is here to get your seeds ordered and your indoor space set up for seed starting.


Each type of vegetable has its own set of rules for getting growing and some of them have a bit more wiggle room with those rules. Here's a list of the most popular homegrown vegetables and how to start them from seed so that you actually end up with the vegetables that you want. 

FYI: We're using the last frost date of March 1 to determine when to start the seeds in NorCal.

A list of equipment for starting seeds indoors is at the end, so just keep a readin'. 

Basil
How to sow: Direct in the garden soil lightly covered with soil or start indoors 3-4 weeks prior to transplanting outdoors by surface sowing (don't cover) and keeping mo-ist

When to start: 2/1 indoors, after 3/1 outdoors 
What to expect: Germination in 5-10 days

Beans (Pole)    How to sow: Direct in the garden soil, 1" deep, 3 seeds per pole
When to start: End of February or after soil temps have exceeded 60 degrees, so after it's been 60 degrees during the day for a week or more 
What to expect: Germination in 3-7 days. Climbing the trellis within a month of germination.
  
How to sow: Direct in the garden soil, 1/2" deep, 3-4 seeds/inch, no need to thin
When to start: After soil temps have exceeded 45 degrees. So, like, whenever you want in NorCal.
What to expect: Germination 7 days, young greens in 2 weeks
  
Carrots
How to sow: Direct in the garden soil, lightly covered with soil, 30 seeds/ft, DO NOT LET SEEDS DRY OUT
When to start: End of February or after soil temps have exceeded 60 degrees, so after it's been 60 degrees during the day for a week or more 
What to expect: If moisture is kept consistent and temperatures warm, germination within 1-3 weeks (yes, they take forever to germinate)

Corn
How to sow: Direct in the garden soil, 1" deep, 1 seed/hole, in blocks of 4 rows (for pollination to occur)
When to start: End of March or after soil temps have exceeded 65 degrees, so after it's been 65 degrees during the day for a week or more 
What to expect: Germination in 7-14 days

Cucumbers
How to sow: Direct in the garden soil, 1" deep, 4-6 seeds per mounded hill
When to start: End of February or after soil temps have exceeded 60 degrees, so after it's been 60 degrees during the day for a week or more  
What to expect: Germination in 7-14 days

Eggplant
How to sow: Start indoors with bottom heat and supplemental light to 12 hours/day, 1/4" deep, 1 seed/cell
When to start: 1/11 or 8-10 weeks before last frost
What to expect: Germination in 10-21 days

Kale
How to sow: Direct in the garden, lightly covered with soil to 1/4"
When to start: Early spring for a spring/summer crop
What to expect: Germination in 10-21 days

Lettuce
How to sow: Direct in the garden, lightly covered with soil to 1/4" according to the depth indicated on the package
When to start: After February 1, while temperatures are still cool
What to expect: Germination in 7-10 days

Melons
How to sow: Direct in the garden soil, 1/2" deep, 4-6 seeds per mounded hill
When to start: End of February or after soil temps have exceeded 60 degrees, so after it's been 60 degrees during the day for a week or more 
What to expect: Germination in 7-10 days

Peas
How to sow: Direct in the garden soil, 2" deep, 6" apart
When to start: Early spring for a spring/summer crop
What to expect: Germination in 7-14 days

Peppers
How to sow: Start indoors with bottom heat and supplemental light to 12 hours/day, 1/4" deep, 1 seed/cell
When to start: 1/11 or 8-10 weeks before last frost
What to expect: Germination in 10-21 days

Squash
How to sow: Direct in the garden soil, 1/2" deep, 1-2 seeds every 3'
When to start: End of February or after soil temps have exceeded 60 degrees, so after it's been 60 degrees during the day for a week or more 
What to expect: Germination in 10-14 days

Tomatoes 
How to sow: Start indoors with bottom heat and supplemental light to 12 hours/day, 1/4" deep, 1-2 seeds/cell
When to start: 1/25 or 8-10 weeks before last frost
What to expect: Germination in 7-10 days
  
Seed starting equipment for indoor growing
Bottom heat: Heat mats
Trays: 11x22 tray
Flats: 72 cell flat
Grow lights: 4' fixture
Soilless mix: Seed starter mix

Wednesday, August 8, 2012

Coaching session: Garden tracking

Everyone can take advantage of this coaching session right here from the blog. No need to book a session!

Like my 1:1 onsite coaching sessions, you'll focus on one aspect of kitchen gardening and learn the specific skills and techniques for mastering it.

In the case of garden tracking, you'll learn how to set up your own garden tracker and establish tracking methods to record your garden's harvests and determine its value. Right here, right now.

You'll learn how to:
1. Access and use the template
2. Customize it for your own use
3. Weigh and track your harvests
4. Assess the true value of your harvests

Tracking your harvests may seem like a tedious task that's not really worth the effort as long as you're able to go out and pick a tomato from time to time, but there's so much more that your garden has to tell you if you take the time to keep track of what's going into and coming out of it.

I've been keeping a garden tracker for four years, dutifully noting each crop that I sow, the cost of planting my gardens and then the yields of each crop and it's been an eye-opening experience to say the least.


Lesson learned: Herbs weigh nothing.

Tracking my garden has helped me learn:
    • How much I spend to install and maintain my garden
      I can be prepared for future seasons and know where to invest.
    • How much my produce is worth per pound
      So that I can see which crops are worth growing and which are worth buying.
    • How much I'm saving by growing my own versus buying it
      So I can justify growing my own rather than going to the store all the time.
    • How many pounds of produce I grow
      This has helped me decide when to expand my garden, change what I grow or how much of any one crop to grow. This is also how I decided to never grow corn again, why I'll always grow tomatoes and how valuable our cherry tree is.
    • The yields of different plants
      I've been able to understand how many plants I need for preserving and how many to plant when I want to increase or decrease the amount of food on hand.
    • My soil test results
      Understanding my soil's needs has helped me to build the healthiest soil for my garden and decode the reasons why some seasons are better than others.
Lesson learned: Tomatoes are heavy valuable crops.

By maintaining my tracker each year, I've been able to see all of that information, plus: 
    • Annual averages of cost, value, yields and savings
      I know how much I typically invest, what kind of harvests I can expect and my overall savings from growing my own food. It's incredible that $90 invested can result in over $1,700 worth of food.
    • Harvest times unique to my garden and climate
      I know when I'll be able to slice open a watermelon or make a platter of heirloom tomatoes for a party. Fourth of July has a whole new meaning in our house since it's usually when we get our first ripe tomato. 
    • Plant varieties that I grow
      There are never any mysteries about "What was that great filet bean we had?" or "Remember that single serving size melon? It was so good that I wish I knew what it was called!" when I go to order seeds in the winter because my tracker keeps all of that handy.
    • Plant performance
      I know which varieties do well and what their yields are so that I don't over or under order when I buy seeds in the winter.
    • Impact of crops on soil condition
      I know what food and cover crops do to my soil so that I can properly rotate, amend and feed my soil what it needs to stay healthy.
Lesson learned: Sugar Baby watermelons are the perfect size for two servings.

But that's all well and good if you don't track your garden's harvests, so let's get started.
To track your harvests
To track your harvests using this method, you'll need a scale (this digital 11 pound scale is a good one), spreadsheet software (I like Google Spreadsheets - it's free and stored in the cloud so that I can make updates from anywhere) and a notebook.
Build your tracker
To get started, you'll want to first customize your spreadsheet with the vegetables you plan to grow this season. You can make a copy of this Google Spreadsheet (File > Make a copy) and then begin adding the following information from your garden: 
  1. Add the vegetables and fruits you are growing to the 'Tallies' and 'Harvest' tabs
    Make note of the varieties you're growing for future seasons.
  2. Add the farmers' market or grocery store prices to the 'Harvest' tab
    Don't forget to use prices for local and organic produce since they're usually higher than standard grocery store fare. Some sources for finding prices in your area are: 
     Kitchen Gardeners International, Rodale Institute, Whole Foods, Papas Organic and Food Co-op. I've also trolled my farmers market with my notebook and noted their costs as well as tripped through Whole Foods taking note of their prices. Don't be shy - this is your bottom line, folks.
  3. Add your planting and maintenance costs to the 'Sow' tab
    You'll update these costs as you go through the season, too, so don't just set it and forget it.
Plant your garden
Then plant your garden as you normally would, keeping track of any costs associated with planting, like extra watering for the vegetables, seeds, soil testing, amendments, seedlings, plant stakes and so on. 

For the sake of tracking watering, I take a baseline amount from a month's bill that doesn't involve a lot of yard watering. January works well because we don't water our outdoor plants in January. Then I subtract January's water bill amount from each month's water bill amount from the growing season to get the difference. That difference is my water cost for the garden and gets added to the tracker. 

Track your harvests
When your garden begins to produce, take one extra step between harvesting and eating to weigh the harvest of each vegetable and make a note in your notebook for later input on your own Garden Harvest Tracker.
My notebook has column headers for:
  • Vegetable
    Beans, tomatoes, cucumbers, etc
  • Ounces
    Most harvests don't weigh in as full pounds, so recording ounces is a better way to go
  • Number
    I like to know whether my tomato harvest that weighed in at 2 pounds was made up of two huge tomatoes or a dozen small ones
  • Date
    This way I can look back at previous seasons to see if I'm on track and also when my harvests will tend to run out for each plant

The tracker will calculate the total costs for sowing and growing your garden and how much it costs per pound to grow. It will also sum up the total pounds of your harvests over the season as well as the true harvest value of your garden after the expenses of sowing have been subtracted.
See the value in your garden
At the end of your first season you'll be able to see how cost effective it can be to grow your own vegetables and fruit. There are even some hidden values that don't show up on your tracker, like the exercise you get from gardening, the saving of fossil fuels because your vegetables didn't have to be transported from field to store and the variety of vegetables you're able to choose from when you're growing from seed.
This is my Garden Tracker in practice from 2009-2012 in Northern California. Just from looking at the first tab of the spreadsheet, which acts a roll-up of the seasons' productivity, you can see that last year I was able to harvest over 260 pounds of produce at an expense of only $60 for a harvest value of over $1,700. 
Holy mackerel, right?
Lesson learned: Cherry tomato plants produce about 15 pounds of fruit but take about 5 times as long to harvest as standards.

Some other nuggets I've gleaned over the years because of the tracker:
  • I tend to get about 50 pounds of tomato per standard tomato plant.
  • Corn is better to buy at the store since it depletes the soil, takes up a ton of room, costs a lot to grow and is super cheap to buy organically and locally.
  • I know that it takes me more than five seasons to go through my organic amendments.
  • I should grow other things on my bean tepee than just green beans because the harvests are overwhelming.
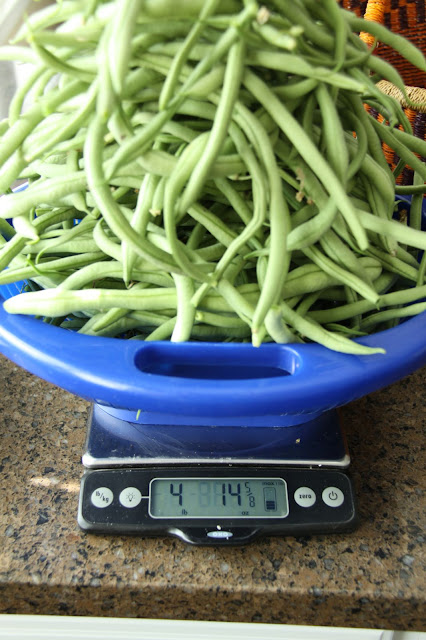
Lesson learned: Four pounds of green beans at one time is way more than one household needs.

Have more garden tracking tips to share? Think this is total bunk? Wondering about other steps in the process that seem mysterious? That's what the comments are for. I'd love to hear what you think. 

Happy tracking, y'all.


Friday, November 25, 2011

Vegetable beef soup

Does this recipe sound sorta boring to you?

It might. That's OK. It kinda does to me, too. Except that I've had it and I know the truth.

It's downright amazing.

And if you doubt that vegetable beef soup can be amazing, then I really think you should try this recipe using, if you have it, your own preserved tomato juice, homegrown vegetables and homemade gravy.

If you don't have all those things I just mentioned and have to jaunt off to the store for some of them, that's totally OK.

We don't judge you at Indie Farms. We just ask that you try growing things so that you can eat good food.

Go on, then.

Vegetable beef soup

IngredientsChopped pot roast (this is a great way to get rid of leftover pot roast) or cooked stew meat
1 medium celery root, peeled and chopped into bite sized pieces 
3 cups of mixed bite-sized vegetables like peas, corn, green beans and carrots
2 heads' worth of broccoli florets
1 quart of tomato or vegetable juice
1 can of beef consume
2 T beef gravy
4 cups of water
1 T dried oregano
1 T ground thyme
Lots of fresh ground pepper

To makeIn a big stock pot, pour in your vegetable juice, consume, gravy and water. Then add in your chopped meat, celery root, mixed vegetables, herbs and broccoli. Stir it together well and cover.

Bring to a boil and then reduce to low to simmer for about 45 minutes to an hour. 

Before you serve, give it a taste and add as much pepper as you like. We like a lot, so I added a good bit. You may be surprised that this recipe doesn't call for salt, since I LOVE salt, but with the vegetable juice and gravy and pot roast, it's PLENTY salty. But, if you must, go ahead. I won't laugh and point when your fingers swell into hot dogs.

Like mine do.

Good eating, friends.