Showing posts with label 1.0 Coaching for October. Show all posts

Thursday, October 25, 2012

Like a cleaning lady for the garden.

It's definitely getting to be that time of year when walking out to the test garden after dark becomes an iffy endeavor.

Mostly because the last thing I want is a big spider web wrapped around my face.

Not a nourishing facial.

BLECH. 

Sorry if I just freaked you out.

In an effort to keep this BLECH EEK EW ACK experience from happening, I keep a close eye on where my resident garden spiders set up shop every fall. They have some favorite haunts, you might say, and I commit these to memory once they've staked their claim around the property.
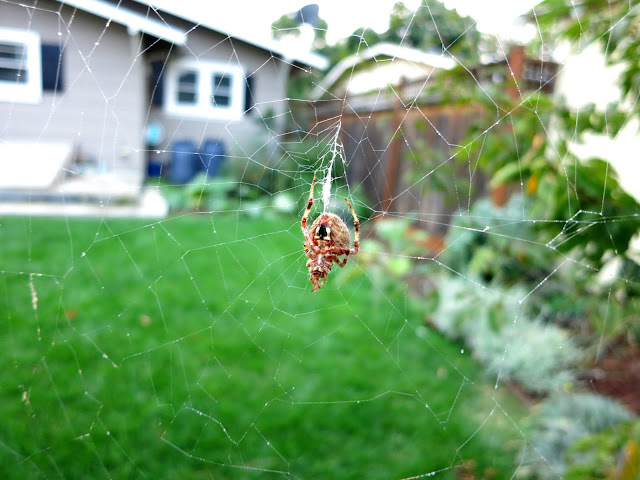
This guy is conveniently out of the way attached to the cherry tree.
This guy is precariously hovering over the lime tree, so, less convenient for the cocktail makers around here.

Even if I were to take down their webs (which NO WAY - I'll tell you why in just a sec), they'd just put them right back in the same spot in no time at all, so it's better for everyone if they're just left alone to do what they do best.

Unfortunately, sometimes I get so involved in what I'm doing that I forget to work around their webs, thus ending up with one, say, wrapped around the end of the shovel handle I'm wielding, but they do rebuild them pretty fast, so I just try to be careful not to bust up the spider along with his/her web.

Must I rebuild this thing every five minutes? Really, woman.

And that best is eating all the pests that fly into their big face-wrapping webs.

I just prefer that they wrap their webs around pests' faces rather than mine, is all.

Assume the face wrapping position.

See, our friendly neighborhood garden spiders are experts at organic pest management.  They eat flies, aphids, mosquitoes, wasps, cabbage moths and anything else that goes near their webs. They aren't picky, just hungry, and they do a really good job of keeping nasties out of the garden.

I'M BUSY.
Sure, sometimes they'll pick up one of our honeybees, but it's a small price to pay for all the cabbage moths that they put down.

OK, I'll let this one go as long as the next thing I see in there is a cabbage moth.
No promises.
And, hey, sometimes they get theirs since we also get a lot of spider-hungry birds out there, so we just let the whole circle of life thing play out and try not to get in the way.

We don't spray, smush or otherwise harm these big beauties and instead just let them clean up the garden for us while we move about carefully and with our arms outstretched in front of our faces, remembering to pick limes from the BACK of the plant rather than the front because HELLO that's a web around your face.

Thursday, October 18, 2012

The smell of Fall

Breathe deep.
You might be thinking that the smell of fall is some heady combination of fallen leaves, spiced pumpkin and fresh rain, but you'd be wrong.

Fall smells like sour socks.

Well, in the test garden's kitchen, anyway.

See, fall is when we take down the summer crops and save seeds from the final remaining fruits that have been languishing on the plants for months.


Most of the fruits don't look all that great anymore, but they're ripe (overripe, actually), huge and the seeds are full of the know-how for creating more healthy plants for next year's garden.


But, in order to get those seeds saved so that they'll be viable for late winter/early spring starting for next year's summer test garden, they have to go through a variety of processes.

And the process for tomato seeds, in particular, involves fermentation.

Which smells like sour socks.

Mmmmmmmmmmmmm...reminiscent of Jockey and Hanes...
Amazing how something so beautiful can smell so NOT beautiful.
But the process of saving seeds from the many varieties of heirloom produce we and our clients grow stocks our seed bank for the coming spring, so it's worth it.


And if you're looking for a handy way to re-purpose the divided boxes that your canning jars come in, the savviest gardener I know (hi, mom!) and your fellow Indie Farmer, puts them to work for seed saving.

How to use canning boxes to organize your seed saving

1. Once you've emptied the box by canning all the edible fruit and vegetables from your garden, use the handy dividers to keep your varieties sorted and protected as you harvest them from your plants.


Each variety gets its own bag and label

Use zipper bags to contain all their goodness (AKA Keep it from leaking all over the place) and mark with masking tape that details the fruit's variety, yield, source and characteristics. Leave the bags open so the fruit doesn't get even grosser in there and tuck each bagged variety into its own compartment in the divided box.

2. When you've decanted the seeds from the fruits to their fermenting jars, restock the box's dividers with your fermenting seeds, transferring the label from the bag to the jar (we like baby food jars for tomato seed saving).


 3. Once your seeds have fermented and are ready to be saved, transfer the label from the jars to plates.


4. And when your seeds are dry and ready for packaging, transfer the label from the plates to your storage container. In our case, we use paper envelopes.

 
Step 5 is the fun part - sowing your home-saved seeds next spring for next summer's garden.

If you want to learn how to save all kinds of seeds (some don't require the aromatic fermentation process, which is nice) for your upcoming spring garden, book a Seed Saving session and we'll go through the process with you step by step.

It's pretty fun and not as stinky as it may sound.

Wednesday, October 10, 2012

Spicy green tomato pickles


I have two questions for you:
  1. Do you have green tomatoes hanging around on your plants?
  2. Do you like Bloody Marys?
If you answered yes, have I got the canning recipe for you.

OK, to be fair I should have asked three questions, with the third being:

    3. Do you know how to can tomatoes?

But, if you don't know how to can tomatoes and you want to learn - Indie Farms has a session just for that. Learn how to use a canner, can some tomatoes, turn your back on storebought canned tomatoes forever - it's a good time.

Meanwhile, if you're looking to do something with the green tomatoes on your plants that will never ripen as the season is about over, this recipe is a delicious combination of my standard tomato canning recipe and my pickle recipe and results in a most fabulous cocktail garnish, appetizer platter winner and green olive stand-in.

"Green" can mean anything that's not 100% ripe. Just for the record.

I gave these as part of my holiday gifts last year and they were the biggest crowd pleaser of all the preserved foods. Even more so than my blackberry jam which shocked the pants right off of me.

Don't worry. I was home alone when it happened.

SO! Ready to preserve the final remains of your summer tomato harvest?

Get to it already. Then take those tomato plants out and put some cover crops in already - it's October!

Sheesh.

Spicy Green Tomato Pickles
Notes in italics

Makes 6 pints (or, in my case, 6 half pints and 2 pints) 
Ingredients
3+ pounds green tomatoes, washed and halved or quartered (bite size is what we're going for)
3 1/2 cups vinegar
3 1/2 cups water
1/4 canning salt (kosher salt works fine)
6+ garlic cloves  (1 per jar)
1-3 T red pepper flakes (you decide how hot you like it)

Equipment
Hot water canner with rack
Canning tools: Jar lifter,  jar funnel, tightener
6 pint jars, 6+ half pint jars or a mix of jars
Lids and bands for all of your jars

To make
Wash your tomatoes and cut them into either halves or quarters with the intention of making them all about the same bite size.


The reason it's important for them to be about the same size is that they'll all process the same and you won't have some that are overdone with some that are less done. 

It's all about consistency of doneness, is what I'm trying to say.


Combine your salt, vinegar, red pepper flakes and water in a large saucepot. Bring to a boil.

We used the full 3 tablespoons because we like it spicy at the test garden.

 If you're using more or less tomatoes than the 3+ pounds in the recipe, you can adjust your water and vinegar mix accordingly - just keep the ratio intact. So, like, if you only have a pound of tomatoes, use 1 1/2 cups of water and 1 1/2 cups of vinegar. 

The ratios are what's really important, so don't be sad and not do this if you only have a pound of tomatoes. You don't *need* 3+ pounds to make this, it's just what I had when I made the recipe. I also will not judge you if you start a full hot water canner for 3 pints of these tomato pickles - they're *that* good.


Pack your tomatoes into hot sterilized jars, leaving 1/4" head space. That's what is recommended out in the great wide world of canning, anyway. 

Did you know that was out there? It is. It's great.

Add 1 clove of garlic to each jar and ladle the hot peppered vinegar mixture over the tomatoes.


Remove air bubbles with a tiny spatula or that little plastic wand that comes with some of your canning tool sets.

Put on the two piece lids and bands.

Process 15 minutes in your hot water canner.

This time around, we had a full house of pints and half pints.

Allow to cool, then make some Bloodys, have your nicer neighbors over for appetizers and cocktails and then throw away your green olives because you're done with those.

These you're just getting started with.

Also, can I ask a favor? I promise I won't get greedy with my favor-asking. 

When you're done canning, let that water cool and then use it to water your plants. Or rinse off your windshield. Or wash your dog. Or something other than just dumping it down the drain.

It's perfectly good sterilized water. You could probably birth a baby with it, but I am not recommending that because I don't know nothin' about birthin' no babies. Also, that screams liability. 

Anyway, as a favor to me and Indie Farms, please don't waste water. Or birth babies on our instruction. Thanks, friends.

Thursday, October 4, 2012

Starting cover crops

With the late heat we've had in Silicon Valley, the cover crops are going to go in a little later than usual so that the summer vegetables can take advantage of the last burst of heat to give us more tomatoes.

Black Brandywine and Better Boy tomatoes. A fine pairing.
Sure, there are other plants out there doing impressive things, but our main concern is usually the tomatoes. This year is no different.

The extra time before planting cover crops and winter food crops is also good because it gives us a chance to start some of our winter crops indoors so that we can plant stronger transplants into the winter garden rather than vulnerable seeds that can get mowed down by a single hungry pest. 

If you've ever put seeds in the ground in spring and then watched as their nubile little stems emerge and then get summarily gnawed to a nub by a mysterious bug under the cover of darkness, you know the pain all too well.

Churchill Brussels sprout starts. Be strong, boys!
We can't have that happening to our beloved Brussels sprouts (or "Winter tomatoes" as we like to call them since we love them oh so much), so we try to start them indoors before planting out.

Other crops are planted so broadly by seed that a few going down the gullets of garden creatures isn't that bad.

Pacific Gold Mustard seeds germinating
On the whole, we'll sow our winter beds with a variety of cover and food crops - some sown directly into the soil and some started as transplants - with the intention of having some fresh food for the winter and healthy soil all around come spring.

Before planting anything, we remove the summer crops, dig in a 2" layer of finished compost and treat the bed with a dose of neem oil to smother overwintering pests and their eggs. 

Then we get down to the business of fall -

Pacific Gold Mustard - sown direct in raised beds for a winter food crop and spring green manure + pest control for next year's tomatoes
Buckwheat - sown direct in a raised bed for green manure and weed control
Fava beans - sown direct in a raised bed for green manure and nitrogen fixing
Brussels sprouts - transplants installed in one half of a raised bed  for a late fall for winter food crop
Dill - sown direct in a raised bed between Brussels sprouts for a winter food crop and to repel pests from the Brussels sprouts
Garlic - sown from seed in one half of a raised bed for a 2013 summer crop and to repel pests and improve the flavor of Brussels sprouts


We still have summer crops saying their final goodbyes in a few spots, but once the temps drop consistently below 70 degrees, they'll come out and the remaining cool season plants will go in. 

Thus completing another summer season and starting a fall and winter season anew.

Bam.

Friday, October 28, 2011

Chard lasagna

Are you scared of chard?


No?

Then perhaps you aren't growing it right now.

That stuff scared me the first time I grew it because it would. not. stop. growing.

It's like postal service of vegetables. Rain, sleet, snow, whatever - it keeps right on delivering the PennySaver even though you've never once looked at it.

The good news is that, unlike the PennySaver, you can tame your chard with a few swift moves.

In this case, lasagna-type moves.

Chard lasagna

Ingredients
1 recipe of The Best Tomato Sauce Ever. Yep.
1 generous bunch of Swiss chard (1 1/2 lbs)
Salt
6 lasagna noodles
Extra virgin olive oil
1/2 cup ricotta cheese
1/2 cup freshly grated Parmesan
1 T chopped fresh herbs (oregano's nice)

To make 
Preheat the oven to 425. 

First, start your tomato sauce.
 
While the tomatoes for your sauce are roasting in the oven boil some seasalty water and, after cutting the big stalks off of your chard and rinsing the leaves in cold water, dunk your full chard leaves in the boiling water for 1 minute. Then take those leaves intact (I find my Oxo tongs do the best job here) and dunk them in icy water.

Some fancy people refer to this process as blanching, but I'm not fancy, so let's just call it dunking.

Then you'll want to squeeze out all this water by stacking those leaves into a neat pile, placing them on one end of an unrolled tea towel and rolling them up while squeezing.

Unroll the towel and take your little chard cigar over to the cutting board for ribboning. The towel can then go into the wash or your kitchen laundry hamper if you have it.

Now you can ribbon slice your funny chard cigar.

Once you're done making the tomato sauce, pour the sauce into a good sized bowl and, with your tongs, toss your sauce with all that ribboned chard.

Then compile it as such:
Coat the bottom of an 8x8 pan with a bit of the sauce mixture
Then one layer of uncooked lasagna noodles
Then ricotta
Then sauce mixture
Then some shredded Parmesan
Repeat once more and finish with noodle, ricotta, sauce,
Parmesan
Sprinkle some salt and oregano on top

Wrap the whole deal with foil and bake in the oven for about 30 minutes. Remove from the oven and let cool, uncovered, for about 5 minutes or until it cools below MOLTEN LAVA temps. Cut and serve with a salad.

Good eating and bye bye chard.