Showing posts with label 4. Coaching for April. Show all posts

Wednesday, April 16, 2014

The deal with soil building


It has come to my attention, through various expressions of eye-rolling, sideways glances and similar distraction techniques during coaching sessions, that soil testing, soil building and soil amending are not folks' favorite gardening subjects.

I know.

It sounds like work. It sounds dirty. It sounds time consuming. It sounds like less fun than madly planting all of the green growies that you just snatched up at the nursery.

But what if I told you that soil building was what turned my mundane, ho-hum, sort of not working garden of yesteryear into the crisper-busting, pantry-bursting, belly-filling beast of today?

Because it was.

Learn from my mistakes, friends, and then get to building that soil in three worthwhile steps.

I'm not going to say it's fast, easy and clean, but I will say that your efforts will be worth it and you'll finally start to see the results from that vegetable garden that you are fantasizing about when you pick out those vegetable seedlings in the spring.

Step #1: Prep
Time commitment: 10 minutes per raised bed
Materials and tools: One 2 cubic foot bag of organic soil amendment per 24 sq. ft. bed, digging fork


Firstly, add a good dose of organic soil amendment to each of your growing areas.

We add one bag of Gardner & Bloome's Harvest Supreme (but feel free to use the organic soil amendment of your choice) to each of our 24 sq. ft. beds, so you can adjust the amount you add based on the size of your space.  Are you amending a bed half the size? Use half the bag.  You get it.

Step #2: Test your soil
Time commitment: 20 minutes per raised bed
Materials and tools: One soil test kit, a clear container that will hold about 6 cups of liquid and soil, trowel, notebook, pencil


You can certainly send soil tests off to a lab to be professionally analyzed - it's a great way to get very specific and accurate reads on all kinds of soil elements, texture, pH and they can also make recommendations for how to amend your soil for the crops you're aiming to grow.

If you're more of a DIYer, I still use home soil tests that you can buy online or at the hardware store. I have heard, and you likely will, too, that these aren't accurate or don't provide enough information or just plain don't work.

Well, this is what I used when I first started testing my soil and it provided good enough results for me to use as a guide for amending my soil. Plus, it gives me the flexibility to test multiple sites without having to send out half a dozen soil samples to be tested.

One test kit has enough material to do multiple tests and includes amending information that you can use to calculate the amounts of amendments you'll need to build your soil for the specific crops you're going to grow. 

Here's my full How-To for testing your soil with these kits.

I estimate that it takes about an hour for me to test, do the calculations (just the tiniest bit of math) and amend my five 24 sq. ft beds.

Step #3: Amend your soil
Time commitment: 10 minutes per raised bed
Materials and tools: Organic dried blood, bone meal, greensand or kelp meal, pH preference and amendment list from your soil test kit, a measuring cup with ounce measurements, your notebook with test results


Once you know what your soil needs and their amounts, just add the amendments (the amounts are smaller than you'd expect), mix them into your soil, water and you're done.

I use only organic amendments like dried blood for nitrogen, bone meal for phosphorus and greensand or kelp meal for potassium. I also add in a handful of worm castings to each bed and that bag of Harvest Supreme I was talking about earlier, so by the time the soil's been amended and watered, it's like a buffet for the plants you're putting in.

Soil microorganisms (think beneficial bacteria) and macro organisms (think worms) are partying in there and the plants will settle in and take off without delay.


And when you get to the end of the warm weather growing season, it'll be time to rotate your crops and plant cover crops anywhere that's not getting a food crop.

This is Bonus Step #4 of soil building, but you can set it aside until fall. You know, when you'll be stuffed full of summer garden goodness and starting to wonder whether you can grow a winter garden because OH THAT SUMMER GARDEN WAS SO AWESOME.

Hint: You can.

Tuesday, April 9, 2013

Beans go boom


I've always liked growing beans.

They aren't bothered by much in the way of pests, they're good for the soil (they fix it with nitrogen), they produce a sometimes overwhelming reliable crop and they cover a structure like it's nobody's business.


And a covered structure in a garden can be a really good thing if you don't have a lot of growing space, want to grow both cooler weather and warmer weather crops and tend to have crops that overlap seasons.


Pole beans are perfect for all of these scenarios.

We really like Fortex pole beans because they're a thinner filet bean that tends to get longer rather than fatter if left on the poles a little too long. And, let's be clear, these things grow and produce fast, so plan to be out picking them every day or be prepared to find some big boys dangling off of those vines.


But since they grow fast and have a pretty long garden life (planted in mid-spring, they'll grow until fall), they can be put in once the days start to warm up a bit and the shade from their scary fast growing vines can protect those early spring crops that don't so much love the warming temperatures.


Like, say, lettuce for instance.

Pole bean seeds are also really easy to save for following seasons. Just leave them on the vines until they're dry and the seeds are rattling around in the pods like weird shaped maracas and then shuck the pods and save the beans in a breathable container (a paper bag or envelope works pretty well) for a few months until no moisture remains. After that they can be stored in a jar or plastic bag without worrying about any moisture fouling up the works.


In the spring time, like right about now, put a few between two sheets of a moistened paper towel on a plate in your kitchen for a few days and, while keeping that paper towel wet, watch for them to sprout.

I think this is where the idea for a mace came from.

 
Once they've sprouted, toss any that didn't sprout and then head out to your garden fence, trellis or tepee to get them planted.

Poke a hole in your loamy garden soil about two knuckles deep and drop the sprouted seed into the hole, root down.


Cover with soil, water thoroughly and then wait for the seedling to emerge.


After that, well, ready your harvest baskets because...

Beans go BOOM

Friday, April 20, 2012

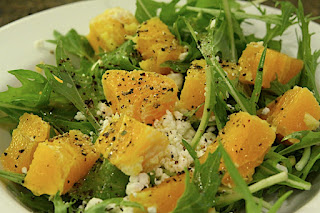
Citrus salad with goat cheese

Have you met mizuna? It's a frilly little salad green found often in Asian dishes. It also does well cooked into hot dishes.

If you have a tajine, you should become friends with mizuna as they play nice together.

Meanwhile, this is not a tajine recipe, nor an Asian recipe. Just something thrown together from the contents of the garden on a spring evening.

Citrus salad with goat cheese

Serves 2
Ingredients
Bunch of mizuna
2 oranges, peeled, cut into small wedges
1/4 cup of crumbled goat cheese
Salt
Pepper
Olive oil

To make:
Rinse the mizuna really well, making sure to knock off any remnant dirt from the farm. Trim off excess stalk at the end. Fill a couple bowls with the mizuna, add goat cheese and oranges, pour on a bit of olive oil, a bit of salt and a healthy grind of pepper.

I like a lot of pepper on this. It's good with the sweet oranges and smoky goat cheese. 

Happy feasting.

Saturday, April 14, 2012

Roasted broccoli with walnuts and prosciutto

This was another tested recipe. This time from RealSimple.

I adapted it to use what I had on hand, plus add a bit of delicious pork, which you'll likely find is a theme around here.

We love our vegetables, obviously, but we're not in the business of offending the regal edible beasts of the land. And so, we add them to our menus, too.

Roasted broccoli with walnuts and prosciutto

Just make the recipe as shown, but sub out orecchiette for whatever small-ish pasta you have on hand (I had whole wheat penne), stir chopped prosciutto (YAY! PORK!) into the mix when you add the broccoli to the pasta, and toss with a bit of asiago, provolone and Parmesan. And if yer real fancy-like, add a bit of black truffle oil. BUT ONLY IF YER FANCY-LIKE.

Also, enjoy.

Wednesday, April 11, 2012

Chocolate beet cake and roasted beet puree


I did a little experiment over the rainy and non-gardeny weekend wherein I set out to try two things:
  1. See if I could successfully create an easy, delicious and not-too-sweet chocolate cake by swapping beet puree for oil in a boxed cake mix.
  2. Pioneer Woman's purported Best Frosting
I am now happy to announce that both experiments were successful.

On the part of the frosting, we can all just give that a big old, "DUH", and move on because since when is one of PW's recipes a dud? Like, never. It's a really good frosting and, it's not super sweet and overly sugary like most frosting, homemade or store-bought.

The cake though? Well, the cake was easy like Sunday morning and as delicious as whatever day is known to be delicious. Thursday? I don't know. Maybe Thursday is a renowned day of deliciousness somewhere.

Anyway, the cake came out amazingly well and the substitutions were awesomely easy. So easy, in fact, that I decided to go all the way with this cake experiment and actually make a traditional layer cake. Something I've not made or had in quite some time due to the rise in popularity of the cupcake. 


Let's not get into my opinion of cupcakes, though.


I found a dark chocolate boxed cake mix at my neighborhood market and promptly followed the directions for baking this mundane beast exactly as called for by the box save for the 1/2 cup of oil.

In that case, I subbed out the oil for the same amount of roasted beet puree, mixed it up with the Kitchenaid and baked two cake pans' worth for the called-for amount of time.

The result? Um, perhaps better than if I'd made it with the oil.

Seriously.

This cake was way good.

Also, though, to employ a snobbish food term that I don't *really* understand, it had a nice crumb. To put it in my terms: it was sproingy without being dry and it wasn't dense at all - where you feel like you're slicing into a giant block of fudge.

And there wasn't any actual beet flavor to be found in this cake, even though the four of us tasting it (or shoveling it into thy face, as some *might* have been) tried real hard to ferret it out.

Before you get started on beet-ing up your boxed chocolate cake mix, make the roasted beet puree as follows and then wait for this cake to blow your hair back. 


It's delicious.


Roasted Beet Puree

Makes approximately 1/4 cup of puree per beet
Ingredients
1+ Beets, topped, scrubbed clean, pricked with a fork

To make
Preheat your oven to 450 degrees.

Wrap beets in foil, 4-5 to a packet and roast in your preheated oven for 55 minutes, or as long as it takes for a fork to easily pierce them to their very core.


Remove beets from their foil packet and with a paper or clean kitchen towel (you may not want to use your best linens for this very RED task), hold each beet in your hand and rub/slide their skins off. 


Put all the skinned beets into a food processor and puree until smooth.


Bag up your beet puree and freeze for up to a year, thawing as needed to retrieve puree for cakes and the like.


Tuesday, April 3, 2012

Oven fried chicken and mixed mash

I will admit that the big draw of this meal in our house is the chicken. 

I will also admit that, when plated, this meal harkens me back to a youth I never experienced but always intrigued me from the other side of the television in the 80s.

In our house, we call this meal "1984", but for the purposes of this post and the recipe archive, we'll call it what it is.

Oven fried chicken with cornflake crust and mixed mash

Oven Fried Chicken with Cornflake Crust
Ingredients
One whole boneless skinless breast of chicken, sliced into two breast halves
1 cup of cornflakes, crushed
1/3 cup flour
1/4 t cayenne pepper
1/3 cup milk
Kosher salt
Pepper

To make
Preheat the oven to 365.

Spray down an 8X8 glass dish with whatever cooking spray you like.

Tenderize the chicken breast until it's about 1/4 inch thick and flat.

Mix flour, cayenne and however much salt and pepper you like in a bowl. Then put the milk in another bowl and the crushed cornflakes in YET another bowl.

Coat each chicken breast in flour, then dip it in milk, then coat it with the crushed cornflakes. Put them in the dish together and bake for 20-30 minutes or until they reach 160 degrees.

Remove from the oven and serve with the other 1984 side dishes and a tall glass of milk if you want to be authentic.

Mixed mash
Ingredients
3 small red potatoes, peeled and quartered
1 medium celery root, peeled and cut into same size pieces as your potatoes
2 T butter or margarine
Kosher salt
Pepper

Bring a pot of salted water to boil while your chicken's in the oven and drop in the potatoes and celery root. Allow it to boil until you can easily pierce a potato or celery root chunk with a fork. Drain the pot of water and return to the stove. Turn off the heat. With your potato masher, mash it all up and then add the butter. Continue to mash until it's smooth and then add salt and pepper to taste.

If you choose to go the add hard boiled egg pieces route, you may add them now, but I will not. That's just not my thing.
 
Keep covered in the pot until ready to serve.

Peas and carrots 
Ingredients 
2 cups of peas
6 carrots, peeled, cut into coins
Water

To make
In a microwavable container, add about 1/4" of water and your sliced carrots. Cover loosely. Microwave on high for approx 2 minutes.

When the carrots are done, pour the peas in the container and stir it up a bit. Put the cover back on and put the covered dish back in the micro. The residual steam and heat will warm your peas.

When the chicken's done, plate it accordingly and watch the last half of Sixteen Candles.

Good eating, friends.